Tables4Act Manual
Custom Tables make it possible to bring complex data sets, unique business processes, and specialized industry practices together inside of Act! to help better manage your business. Custom Tables bring spreadsheet-like functionality into Act!, enabling you to track & manage rich complex data that you can link to contacts, companies, groups, and opportunities for easy reference.
Custom table data can be viewed singularly under one contact, or globally as a whole. Imagine viewing the lease of one customer, and then pivoting to see all the active leases for your business. From a global view you can filter, sort, calculate, and report on this data to better understand your book of business. And what works for leases can also work insurance policies, mortgages, loans, support contracts, product inventory, you name it.
- Tables4Act Manual
Installation
- Download the installer at: http://www.act4work.com/files/Tables4Act/
- Follow the prompts to run the installation and register your product which the serial number provided.

Creating a Custom Table
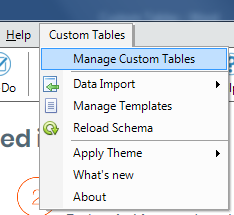
- Click Custom Tables > Manage Custom Tables.
- Under Table Management, click Create Table.
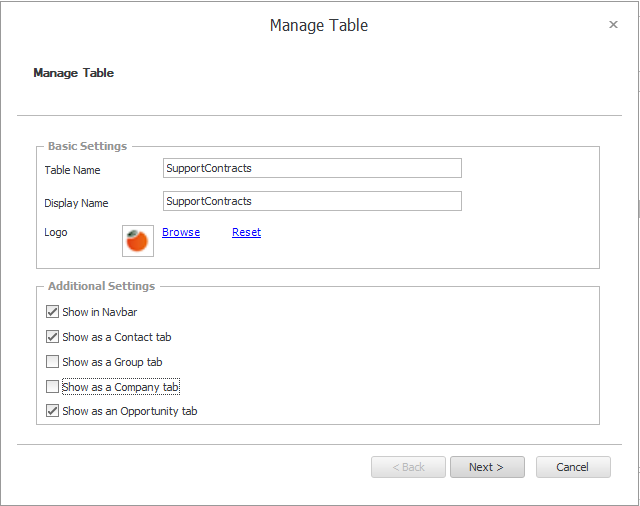
- Enter a Table Name which is the name the table will be given within SQL. Optionally, you may enter a different Display Name which is the name that will actually be displayed within the Act! program. Note that the Display Name can be changed later, however the Table Name cannot.
NOTE: As the Table Name will be listed in SQL it follows those naming conventions, i.e. it cannot contain any spaces, it must be less than 32 characters etc. otherwise you will receive an error message when you try to proceed. The Display Name however does not need to follow these conventions.
- You can also choose a Logo for the custom table at this point which will be displayed next to the table name in the navigation bar once the table has been created. To make use of this, you will need to browse to your own appropriate image file.
- Under Additional Settings, select all of the areas where you would like the custom table to display. These options can be amended later if ever needed.
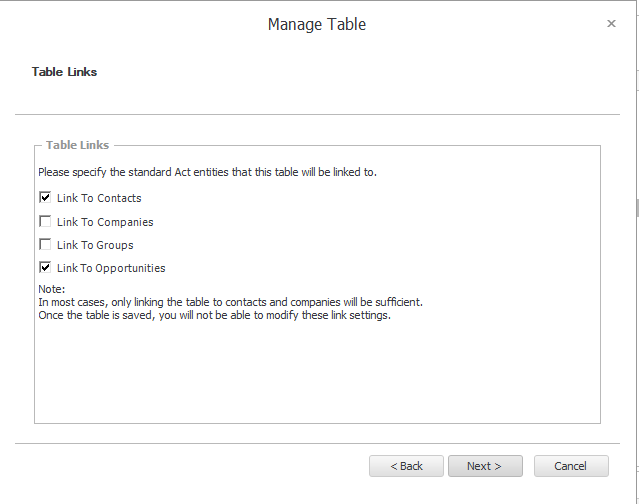
- Click Next. Select the Act! entities the table will link to. In most cases Contacts and Companies are sufficient, but note that this selection CANNOT be changed later.
NOTE: When choosing your entities, you must make sure these match the Additional Settings that you chose in the screenshot above. For example, if you had ticked Show as a Group tab above, then you would need to make sure so select Link to Groups in the screenshot below.
- Linking custom tables to more than two Act! entities may have a negative performance impact and should be done only if absolutely necessary.
- Click Next to confirm, and Next again to create the table. At the time of Table creation, child table dropdown will not be functional. This setting can be adjusted later, once you create parent-child relationship under Manage Parent Tables.
- NOTE: As advised in the final screen, the database will be locked upon the creation of the table.
- The table can take a few minutes to create, and as advised it is best not to interrupt this process.
- Once the table has been completed successfully, you will receive a confirmation message. Click Finish to continue.
Creating Custom Table Fields
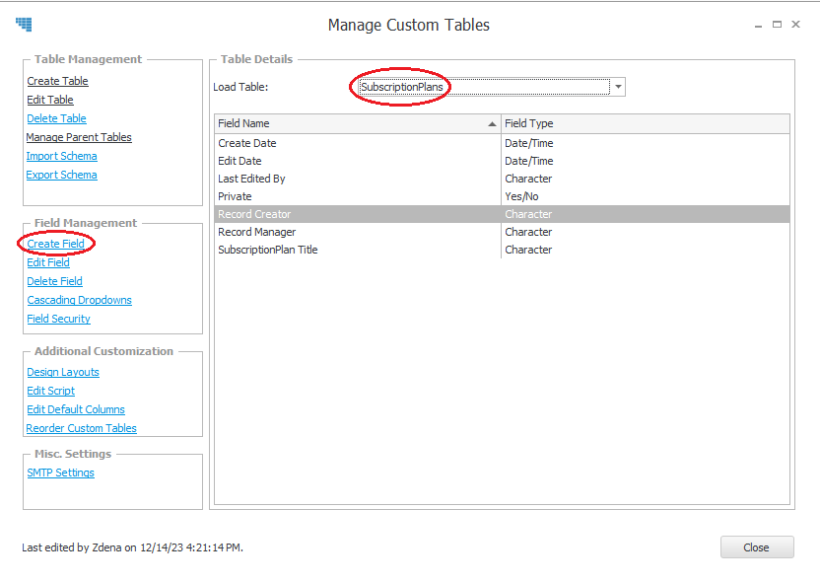
New custom tables come with a set of default fields:
- Create Date
- Edit Date
- Last Edited By
- Private
- Record Creator
- Record Manager
Most of these fields are system fields which are not manually updated. To add to these fields, select the desired table in the top dropdown, and then click Create Field.
Available Field Types
From the dropdown, you will be able to select from the following field types:
- Activity
- Annual Event
- Calculated
- Character
- Currency
- Date
- Date/Time
- Decimal
- Initial-Caps
- Link
- Lowercase
- Memo
- Number
- Picture
- Progress
- Time
- Uppercase
- URL Address
- Yes/No
For more information about Act! field types, please check out Act! Knowledgebase.
The setting options will adjust to each field type.
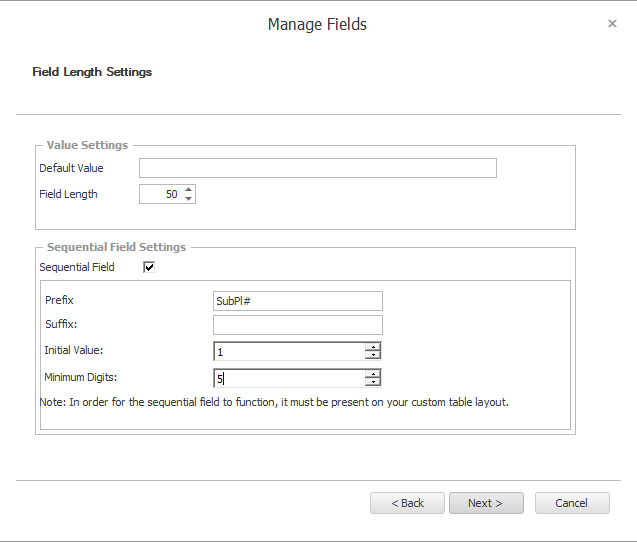
Sequential Fields
If you need to generate a unique identifier for each entry, you are able to Create a Sequential Field. You must ensure that the sequential field is present in data entry layouts for if to function properly.
Dropdowns
You can control values entered into field by requiring selection from dropdowns. These can be either regular or cascading. For further discussion, please see Adding values to dropdowns , and Cascading Dropdowns.
Relationships between Custom Tables
Once you have created at least 2 tables, you can set a one-to-many relationship between them. In addition to the tables themselves, you will need to create the Link field in both tables. The Link field must be a character field with a length of at least 36 characters. The Link field in the parent table is used to store the unique IDs of records and will not be modified manually from child table.
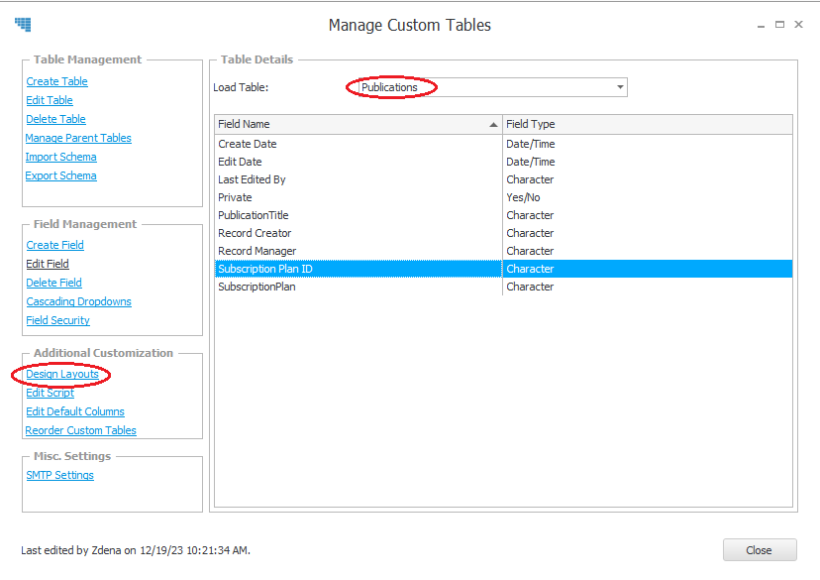
To create the relationship, open Custom Tables > Manage Custom Tables and in the Table Dropdown, select the child table you wish to link to a parent table.
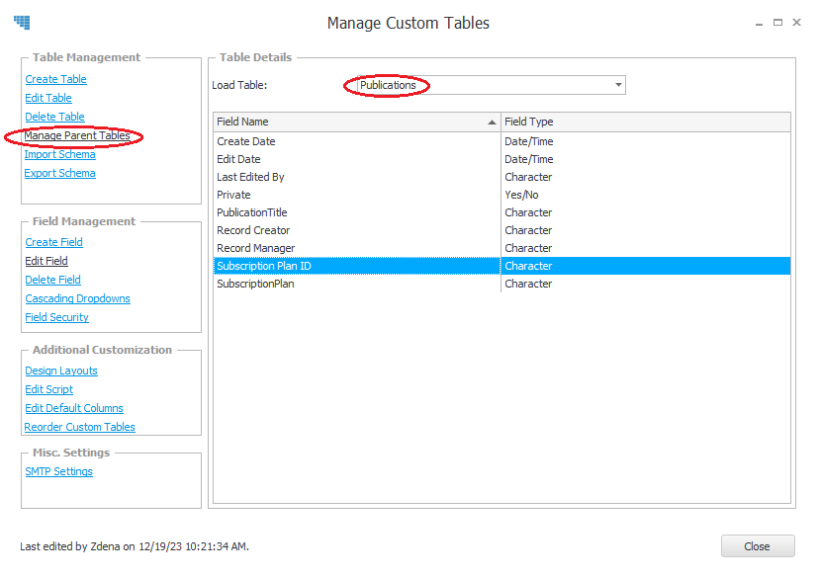
- Click Manage Parent Tables link.
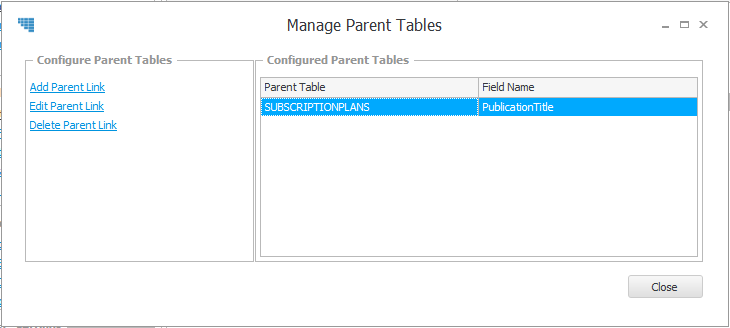
- Click Add Parent Link
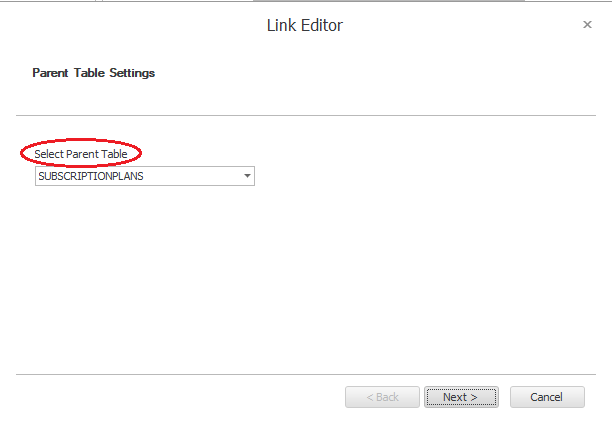
- In Parent Table Settings you will be provided with the list of tables eligible to become the parent table. Select the desired one, and click next.
- In Table Links you will be provided with the list of fields eligible to become the link field. Select the desired field, and click next.

- You will receive a Confirmation notice.
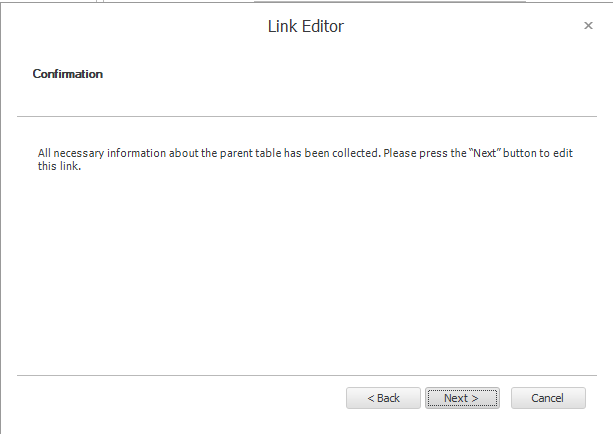
- Click Next. Then Click Finish. The layout designer, and list views will now recognize these tables as having one to many relationship of parent and child.
Designing Layouts
To create the a data-entry layout, open Custom Tables > Manage Custom Tables and in the Table Dropdown, select the which should be used in the Layout.
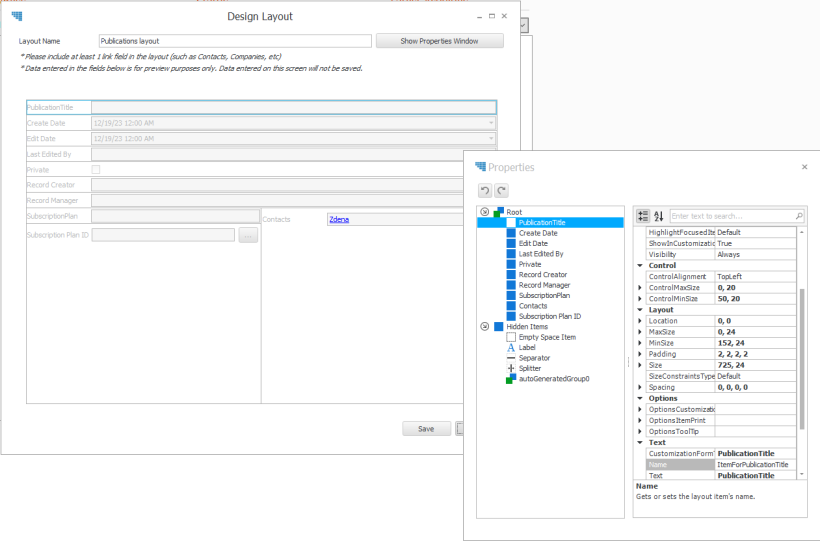
Properties Window
From the Properties Window, drag fields to the Layout. Child custom tables can also be easily dragged to the layout as list with its own controls which will then allow the user to expand the records using the default layout for the child table. Properties Window provides you with access to a number of complex settings. If you need customization with requires expert technical knowledge, you can request scoping by emailing [email protected]
Default Layout
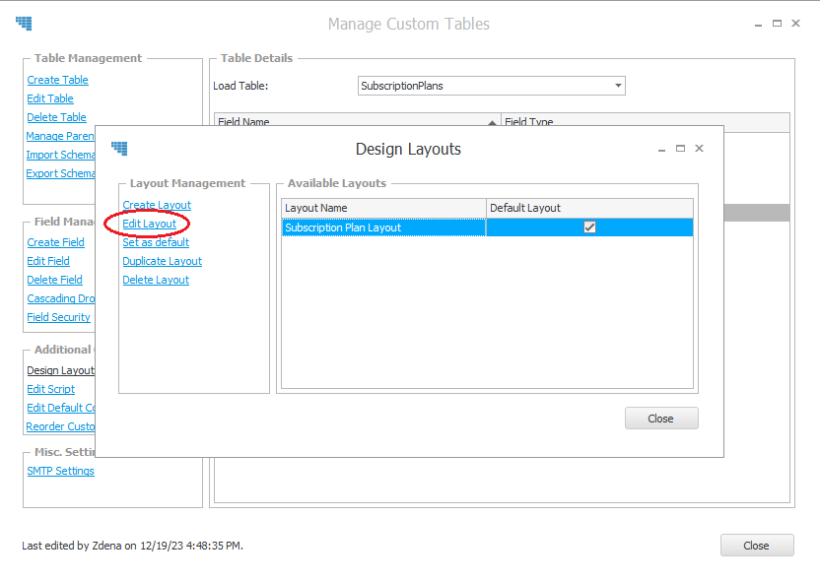
Custom tables allows you to create multiple layouts to suit your needs. To set Default Layout for your table, open Custom Tables > Manage Custom Tables and in the Table Dropdown, select the desired Table. You will be able to access setting for default by clicking Design Layouts link, and then Set as default link.
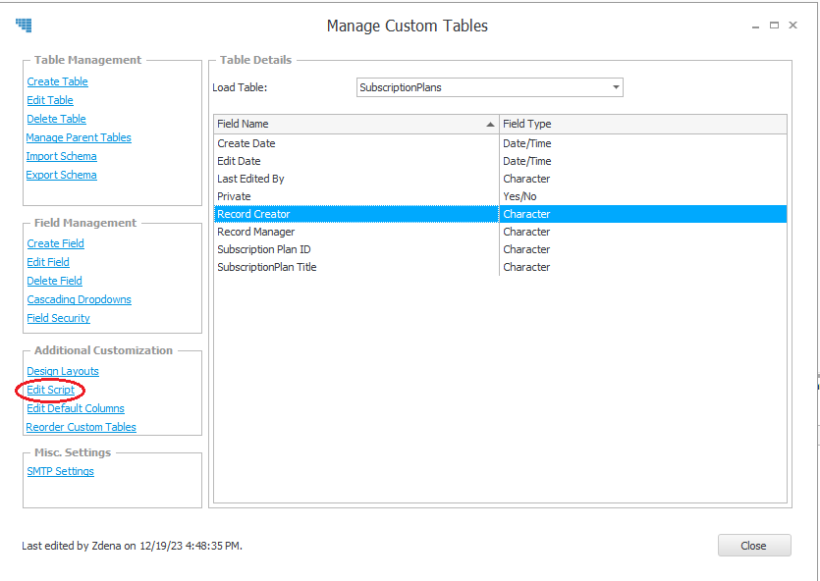
Scripting
Scripting can be accessed via Edit Script link. If you need custom scripting, you can request scoping by emailing [email protected] .
Industry Template Library
Tables4Act offers a template library which can be accessed from Custom Tables menu > Industry Template Library. Available templates can be browsed by function and by industry.
Templates by Function
Templates by function are:
- Consulting
- Event Planning
- Product Inventory
- Project Management
- Service
- Support Contracts
Templates by Industry
Templates by industry are:
- Insurance
- Loans
- Mortgage
- Realty
- Software
Applying Templates
To apply the templates:
- Go to Custom Tables menu > Industry Template Library,
- Select one of the options available under function or industry, and click Apply button.
- Click Next for Select the Tables to Import.
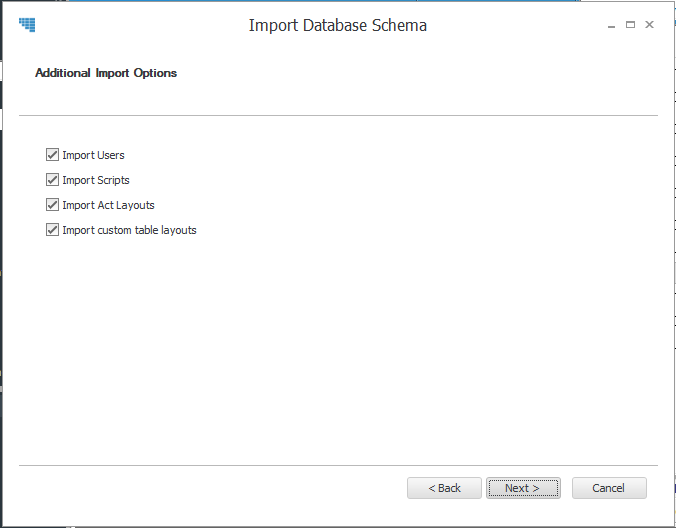
- Click Next for Additional Import Options
- Click Next in the Confirmation window.
- Importing Schema window will appear and you will be able to observe elements imported.
- Once the import process is complete, you will receive a Schema imported successfully message
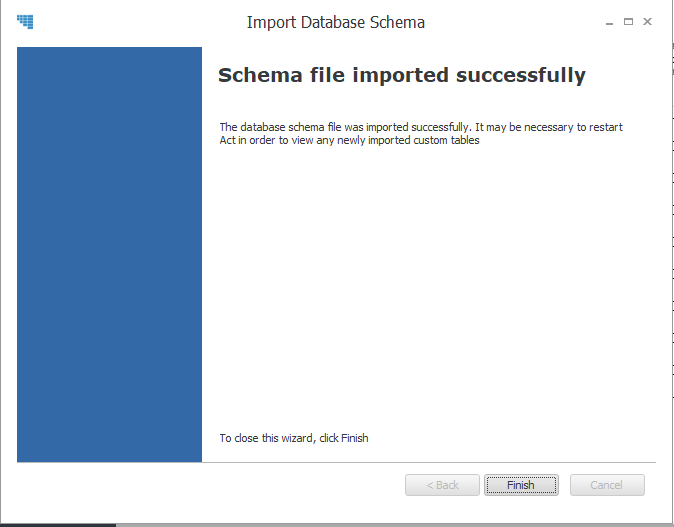
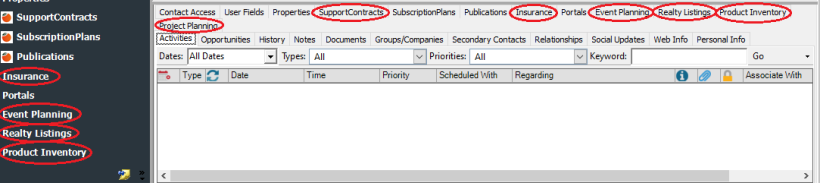
- You will be able to click Finish button. This will set up your Act! to allow you to work with newly imported elements, such as some of the functional and industry tables showing below.
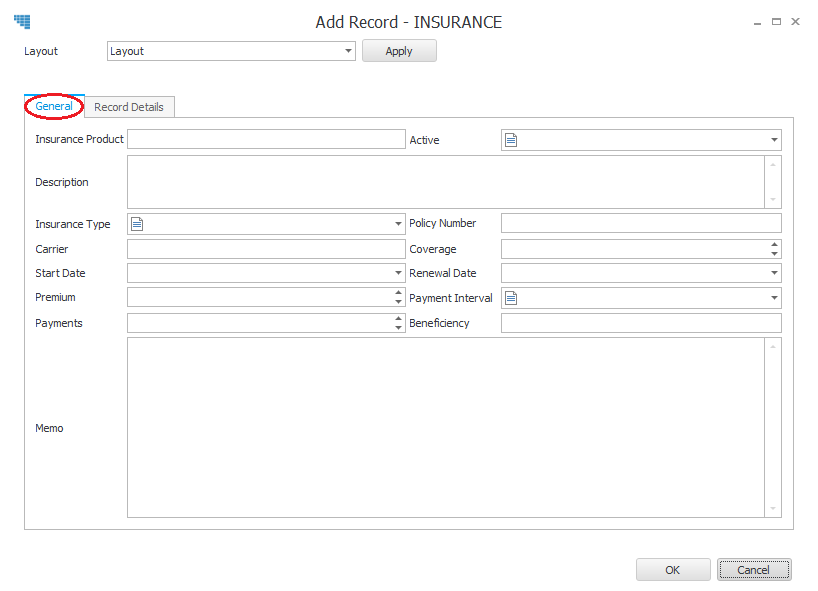
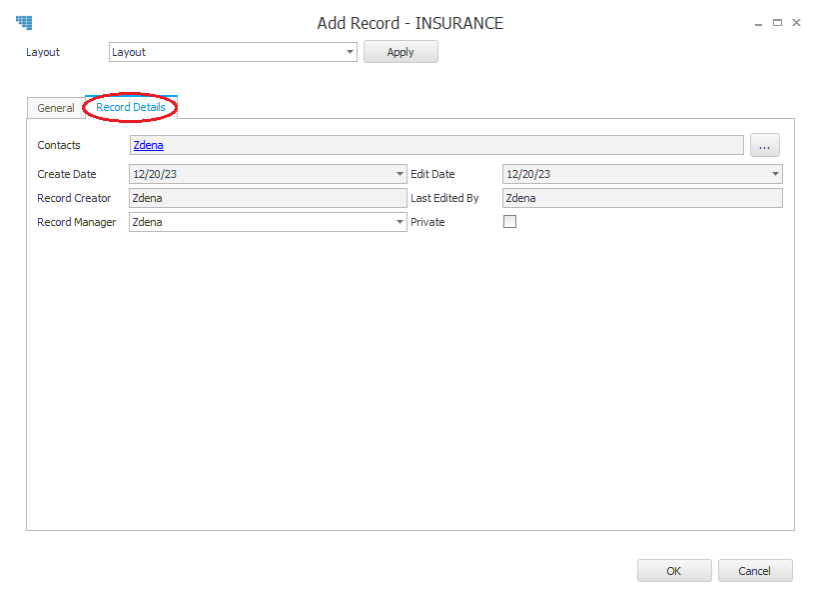
Layouts from Templates
For clarity, most layouts applied by templates are split into two tabs:
General Tab
General Tab is the main data-entry form for the new table
Record details tab mostly contains Act! system fields which inform you about the record but are not manually edited
Record Details Tab
Customization of Imported Elements
Once the elements of the template are applied, you will be able to customize them by adding further fields, or by applying logos/icons to them using the same tools you would use when building tables, and layouts 'from scratch'. Newly created fields will also need to be added to layouts, and column settings for list views
Adding Values to Dropdowns
Some fields anticipate using restricted dropdown list to control how the same product category, or the same process is recorded. The values for the dropdown list can than be created, and modified by your company to suit the company's customary language.
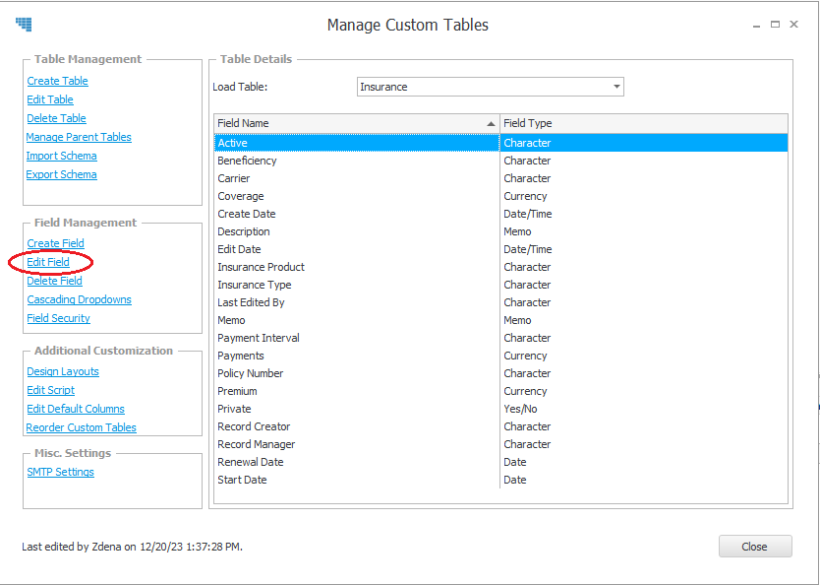
- To access available values, go to Custom Tables > Manage Custom Tables, and select your new table from the Load Table dropdown at the top.
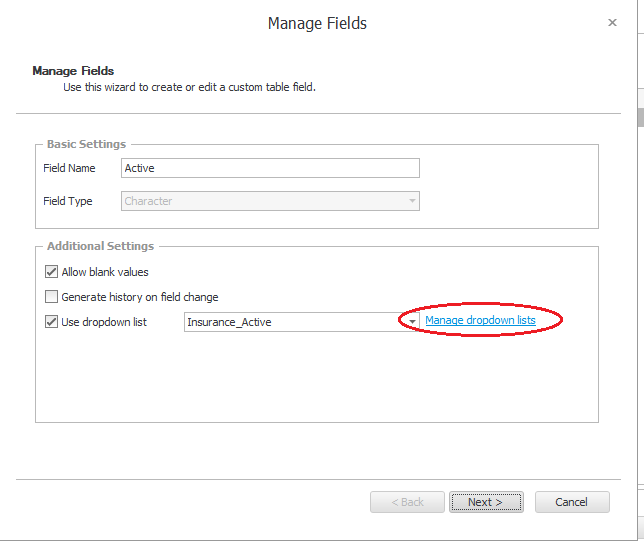
- Highlight the desired field, click Edit Field
- In the Use Dropdown List settings, click Manage Field Dropdowns link.
- Highlight the required dropdown list, and click Edit dropdown list link.
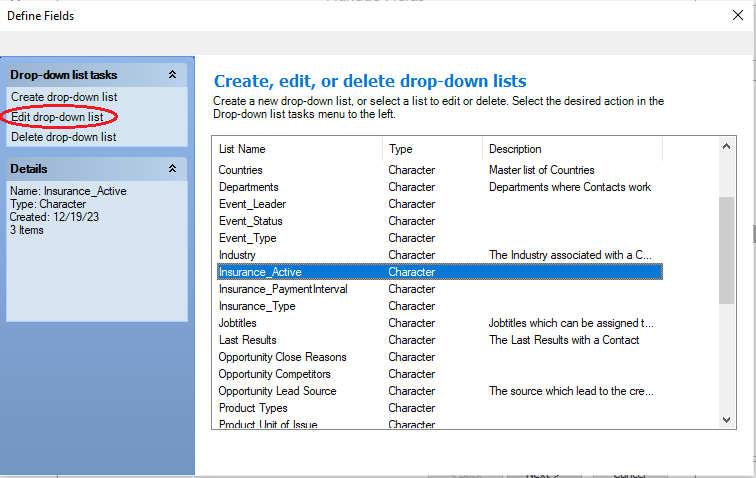
- You will be able to tailor your dropdown list settings (such as whether the users can edit the list), and click next.
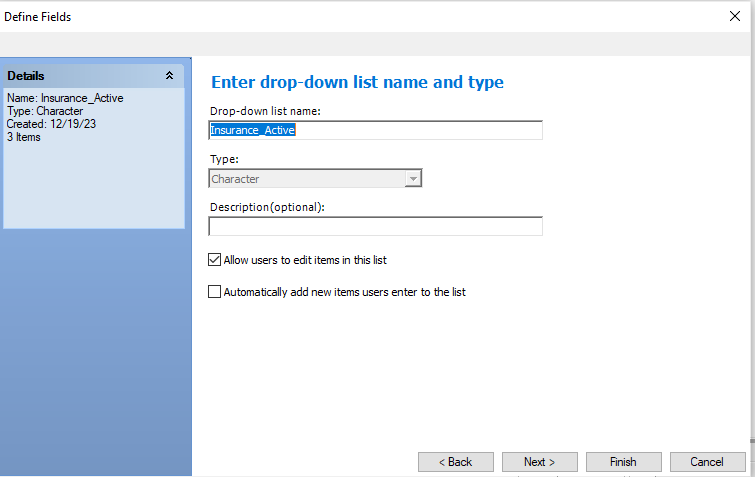
- Add or Delete values as needed, and click Finish.
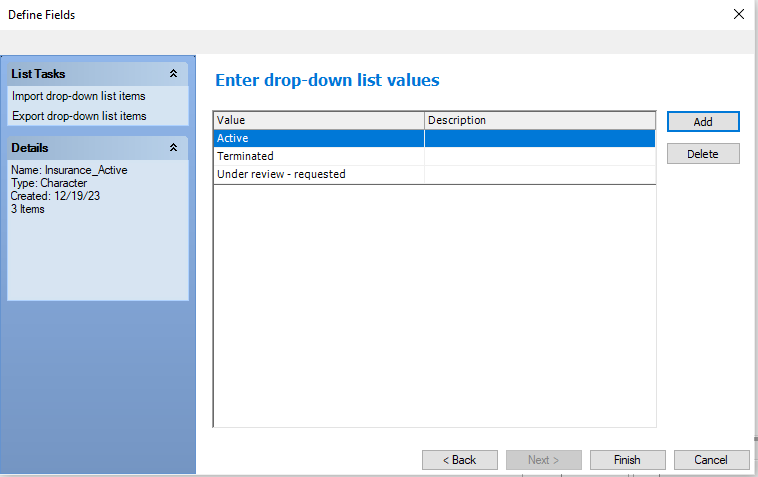
If you needed to create a dropdown list rather than editing one, you will have to go back to ensure that the newly created dropdown is correctly associated with your field table.
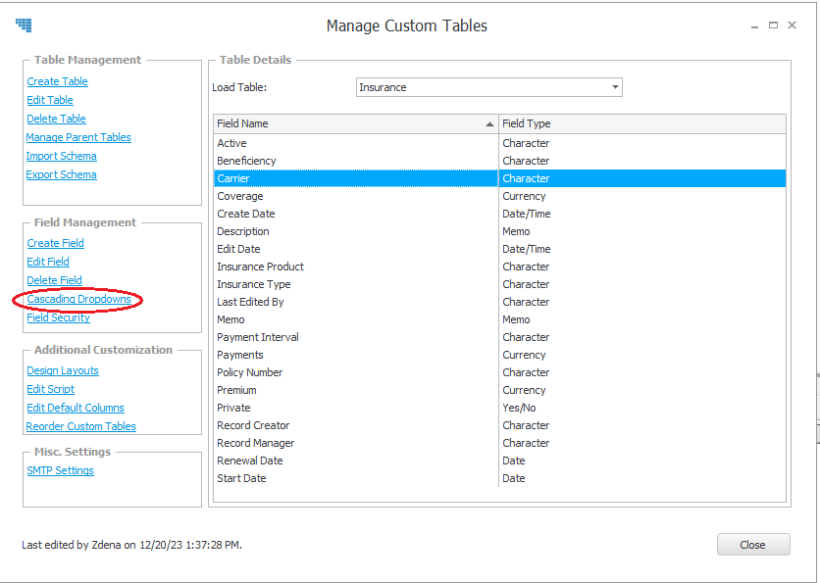
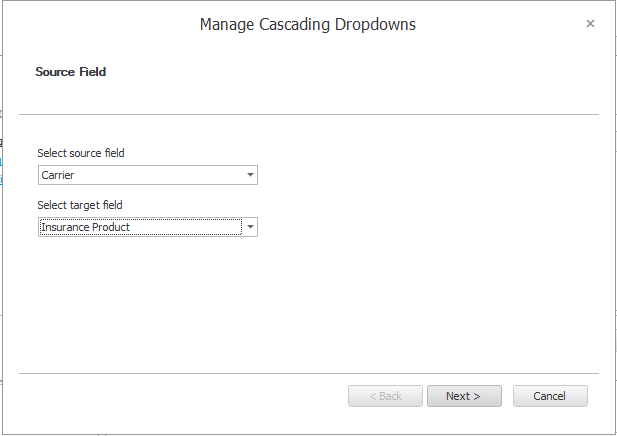
Cascading Dropdowns
Cascading dropdowns are useful where values of one field can be preselected by the values of another field. For example, selection of an insurance provider can preselect the options for an insurance product. To configure how these products are preselected, you must first create dropdowns for insurance providers, and insurance products.
- To associate values of 2 fields together in a cascading dropdown, go to Custom Tables > Manage Custom Tables, and select your new table from the Load Table dropdown at the top.
- Click Cascading Dropdowns link
- Click Add Cascading Dropdowns
- From dropdowns, select source field and target field. Source field is the field which predetermines values in the target field
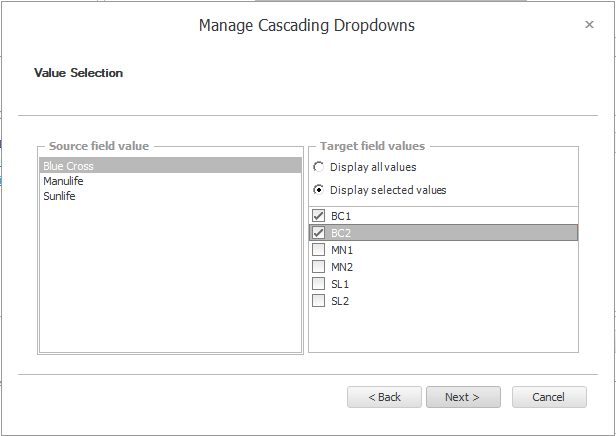
- In Value Selection window, for each entry from the source field select all appropriate values from the target field.
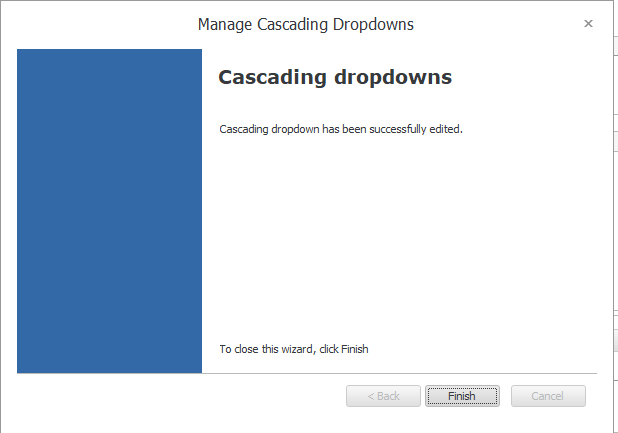
- You will receive a Confirmation. Click Finish.
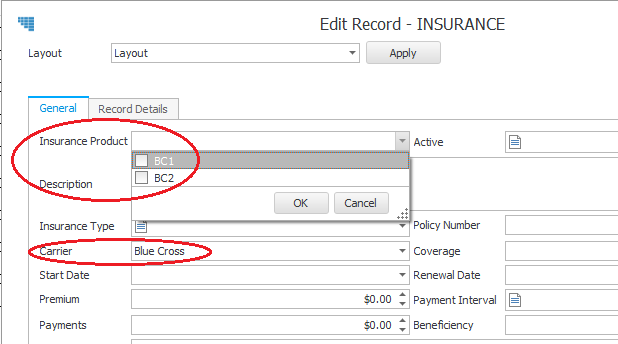
- For the user, the options for entries in the target field will now be limited to setting made for source field
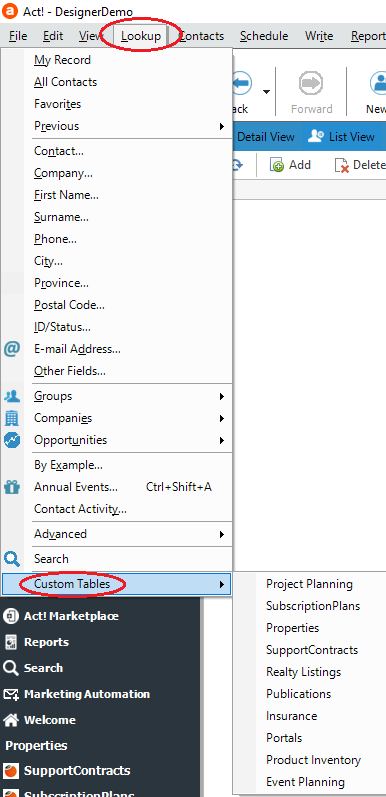
Querying Custom Tables
You can run complex queries in custom tables.
- Go to Lookup > Custom Tables.
- Select the table you wish to query
You will be able to lookup your data using the methods available in Act! Advanced Query
- Parentheses allow you to nest parameters as desired.
- And/Or operators can be used between different parameters.
- Field list will allow you to select desired fields.
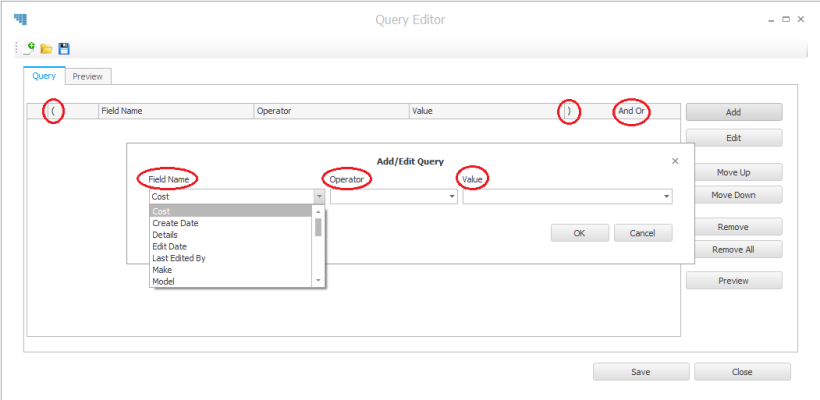
- Field-level operators adjust to each field's type.
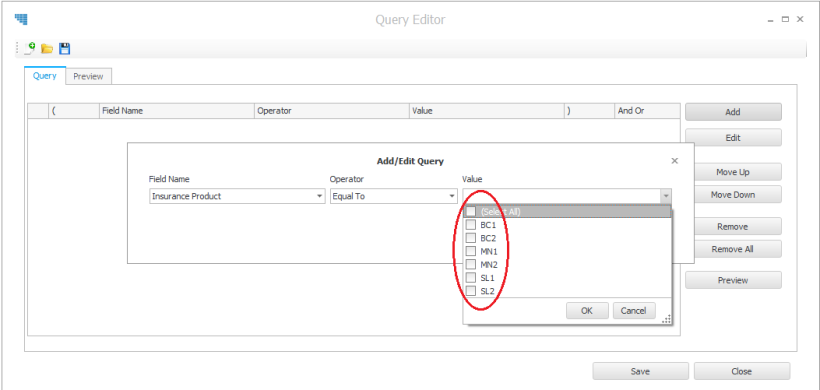
- If the field's values are restricted by a dropdown, this dropdown will be available while building your lookup.
Email Configuration
To access Email Configuration, select Custom Tables > Manage SMTP Settings. You may need to ask your email administrator you provide you with the required information.
Email Templates
- To create templates to merge to email, select Custom Tables > Manage Templates.
- As a default, you will be presented with blank new template to work with. If you wish to edit an existing template, select File > Open in the Template Editor window.
- Type the text which should be included in your message, and position your cursor in the place where you want to add a value from an Act! field.
- In Insert Merge Field window, first select desired table in the Record Type
- Double-click the desired field to add it to the template.
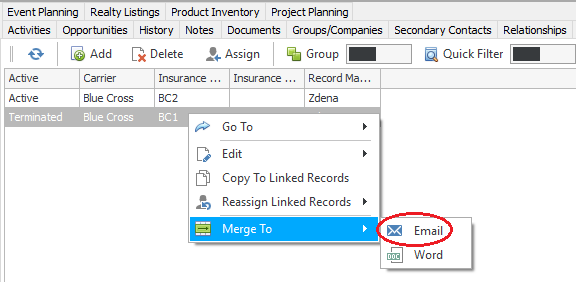
Merging to Email
- To merge a record to email, right-click the record.
- Select Merge to > Email
Reports and Charts
Reports
To create a report, select Custom Tables > Reports > Report Designer. As a default, you will be presented with blank report to work with. If you wish to edit an existing report, you can browse to it from Open icon.
Important Elements of Report Designer

- Custom Table Dropdown allows you to select the table you wish to report from. This is an important initial step, and most other elements will not be operational until this is done.
- Filters allows you to build a query which will restrict the scope of your report.
- Preview will show you how your data behaves in the report you are building.
- Field list allows you to drag desired fields into your report.
- Properties Grid allows you to access properties of the elements highlighted above.
- Group and Sort
Charts
The chart icon present in list view will allow you to launch chart wizard.
Your will need to select if you are interested in a graph or KPI.
Graph
Graph will offer a visual representation of your data. Available Graph styles are:
- Bar
- Pie
- Line
- Funnel
KPI
KPI will summarize your data numerically, using various functions such as count, sum, average, maximum, and minimum. KPI charts are:
- simple - summarizing values of 2 fields
- complex - summarizing values of 3 fields