QSales Manual
Keystroke's Qsales seamlessly integrates your Act! and Quickbooks applications together to give your whole team the account visibility they need to be more productive and informed. Having the data to see contacts as customers allows users to understand the value of an account in an instant, including their account status, product preferences, payment patterns, and even the volume of business from year to year.
Our approach with this manual will be to explain the features from a contextual perspective, which is to say the features as you see them in different sections of Act!. We’ll cover the Qsales toolbar, the three data tabs in the Contact record section (eg., QB Transactions, QB Items, and QB Data), the utilities under the Tools menu, and finally the features included in the Opportunity section.
As Act! is a contact-centric CRM, let’s begin with the Qsales Toolbar display over the Details view in the Contact record.
- QSales Manual
- 2
- LINK TO CONTACT
- QUOTING4ACT
- INSTALLATION WIZARD
- NEW OR EXISTING DATABASE?
- SHOW THE WIZARD AT STARTUP
1
Quick 'How To'
QB Create/Link Customer/Job:
From left to right, the toolbar includes the Link feature for linking Contacts in Act! with the corresponding Customers and Vendors in Act!.

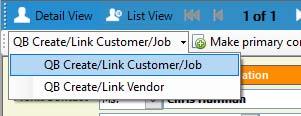
QB Create/Link Customer/Job
This allows you to link or unlink a contact record in Act! to a Customer in QuickBooks. Clicking on this option in the dropdown menu will invoke the following window
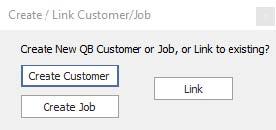
Please note that if you invoke this feature with a contact that is already linked to QuickBooks, you will be prompted to first “unlink” them
Clicking “Create Customer”
This will immediately load a “Create New Customer” window with the suggested customer name prepopulated

Customer Configuration Window
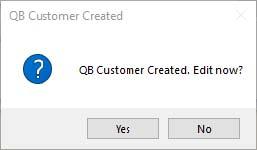
When you click the “create” button, you’ll get a confirmation window reporting that the customer has been created, and prompts you to Edit that customer now.
Customer Edit Window
An edit window with all the contact details that will be saved immediately in QuickBooks will appear, with that Contact records details pre-populated. Unlike before, this feature works within Act! and does not require QuickBooks to be open or even installed on the user’s workstation.

The Edit screen is also a good place to copy the Billing Address details over to the Shipping Address fields, or add additional information like “CC Email” that isn’t normally included in the contact record.
The Tabs on the left side of this Window displays different sections of the Customer information in QuickBooks, but most fields are read-only based on the SDK of QuickBooks. Click “Save” in the bottom right corner of this window to complete the “Create Customer” process
Create Job
Clicking “Create Job” will create a Job in QuickBooks, which is essentially a nested customer under a parent Customer.
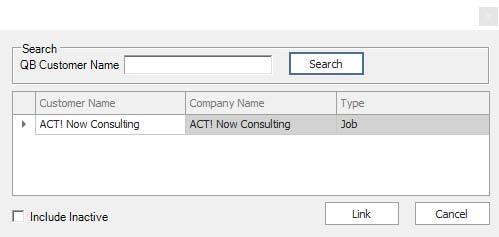
Clicking “Link” allows you to search for an existing Customer in QuickBooks and link them to the open Contact record in Act!. This process will search QuickBooks based on the company name of that Contact record in Act!, but you can also add different search parameters if you’d like to search by the Contact name or email instead.
Make primary contact:
This feature allows you to set the current contact as the primary one for that company, and checks the primary contact checkbox under the “QB Data” tab. This feature is for lookups and reporting.

Invoice
This button is for creating transactions, and the transaction type (in this case “invoice”) will display the last one used until you restart Act!. The transaction types supported under this feature are Invoice, Estimate, Sales Order, Sales Receipt, Credit Memo, and Receive Payment.

Unlike past versions of Qsales, the create transaction feature works completely within Act! and records the result in QuickBooks. Previously it would just launch the transaction type inside of QuickBooks and load the customer information within it
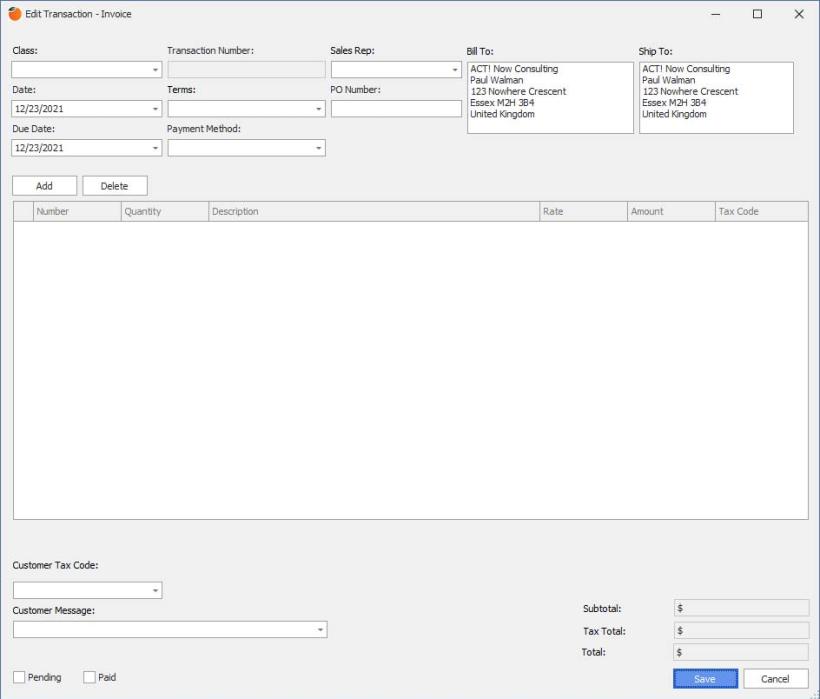
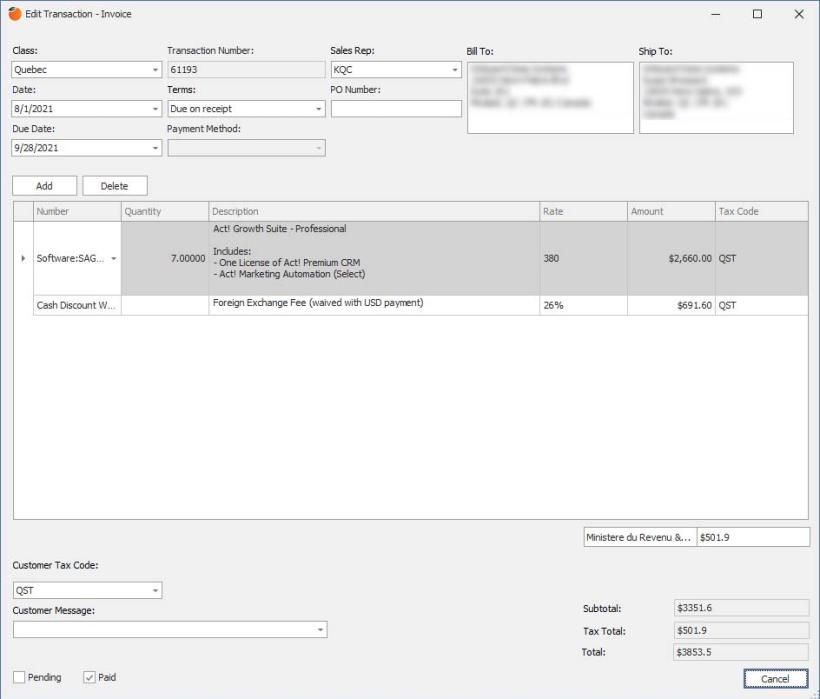
Most of these transaction types, save for Receiving payments, will be similar in appearance. The following is how a new Invoice will appear
The Creating Invoice feature includes options for editing the fields for Class, Terms, Sales Rep, customer Tax Code, and Customer Message on the fly. You can also flag the transaction as Pending in the bottom left checkbox if the transaction needs to be approved before being posted in QuickBooks (there is an option in the setup to enforce all new transactions created with Qsales as “Pending”
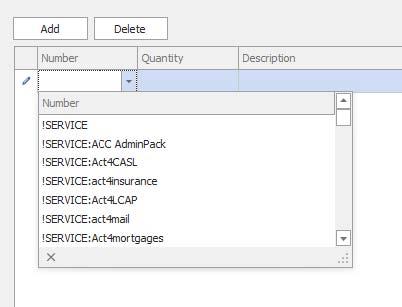
To add or remove products or services to the invoice, please use the Add/Delete buttons. By clicking on “Add”, you’ll be inserted into the next available product/service line in Edit mode, where you can select from the dropdown under the first column entitled “Number”
This section also includes a Type-ahead search to help you find the products or services you’re looking to add to the transaction. Please note the Qsync and Transaction Sync process imports all the QuickBooks items into the Product table in Act!, so when you create a transaction with these products, QuickBooks will recognize them.
In the line item, once a product/service is selected form the drop-down, you can change the quantity, Description, Rate, Amount, and even tax code on the fly – much as you can do in QuickBooks.
When you’re done, click “Save”, and a small window will popup confirming that the transaction has been created in QuickBooks, and what number the transaction has been assigned (based on the next in sequence in QuickBooks).
Edit Record in QB:
This feature allows you to update the link customer ore vendor in QuickBooks from within Act!. This feature launches an edit screen similar to what we displayed previously when creating a new customer from a contact

Refresh Data from QB:
As Qsales for Act! does not maintain a live data link with QuickBooks, new transactions created since the previous night’s sync may not be reflected in the contact’s transaction details. The “Refresh from QuickBooks” option allows you to quickly pull the updates from QuickBooks to ensure the contact record is current with all transactions.
Please note this feature is disabled for remote users with subscriber databases
o When you click on this option, you’ll be presented with the option to sync new/modified transactions. You can select “Yes” to sync only new changes, or “No” to force all existing transactions to be update

o Whichever option you select, while this process is running, you’ll see the Toolbar option change to show the refresh process is running.

o When this process is completed, you’ll be presented with a confirmation window
o Once this is done, it’s best to go to the QB Transactions Tab and click the Refresh tab in that section, and then click Tools > Refresh Data in Act! (F5) to force a refresh at the contact level. This will sometimes update the Credit Alert feature on the Qsales Toolbar (more on the Credit Alert feature later).
Lookup Transaction:
The next Toolbar feature is Lookup Transaction, and in this case it does mostly what the name suggest, except it actually searches for the Contact linked to the transaction you’re looking for, and not the transaction itself. When you click on this toolbar feature, the following dialogue box will display:

Enter the transaction number you’re looking for, and select the transaction type from the dropdown menu in the field below (default is “Invoice”), and then click OK.
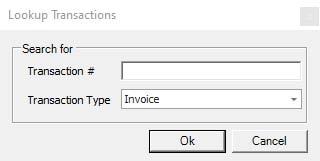
A search progress bar will display moving from left to right, and when it’s complete the contact linked to that transaction will be displayed. Click on the QB Transactions Tab to find the specific transaction in question. If you have a lot of transactions under that contact, you can click the filter button at the top of the “Number” column and search for that transaction number.

Act! > QB/ QB > Act! data push:
One of the big benefits of Qsales is how it saves users time by reducing the need to enter customer information in both Act! and QuickBooks.
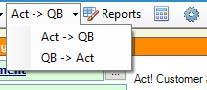
This option helps reduce such duplication of labour, as you can enter contact updates in Act!, and then push those changes to the linked customer/vendor in QuickBooks, or vice versa, pull QuickBooks updates into the linked contact record in Act!.
The Toolbar will always display the last direction you used, so if you see Act! > QB, and you want to pull the data in the other direction, click the little dropdown arrow to the right of this toolbar option, and the two options will be displayed (as seen below)
Once you select a direction, it will take 5-15 seconds to complete, and then will present a window confirming this update process is complete. Once done, we recommend you check the record in either Act! or QuickBooks to confirm the changes were made. You may have to hit F5 or refresh for the changes to appear.

Qsales Report Wizard
One of the major new features of Qsales v13 is the Report Wizard, as displayed above. The available reports are divided into two categories, Customer Reports and Transaction Reports, and each are comprised of different collection, sales, revenue, and product reports that run completely inside of Act!

To improve the flexibility of these reports, most of them contain run-time conditions allowing you to set custom date ranges, total number of results in a reports, as well as even which products are included.
As you might guess, each of the available reports serve a different function, with the purpose of each easily understood by their name.
Customer Reports
- Top Customers by sales for current year
- Top Customers by sales for last year
- Top Customers by sales (lifetime)
- Top Customers with past due balance (collection report)
- Top Customers with highest balance
- All Customers with past due balance
Transaction Reports
- Top grossing products this year (greatest revenue)
- Most sold products this year (greatest quantity)
- Product report by type (allows you to search for contacts that purchased a particular product)
- Invoices due this week (collection report)
- Invoices due last week (collection report)
- Sales Rep report (this week)
- Sales Rep report (this month)
- Sales Rep report (this year)

Qsales Toolbar Options
To allow each customer to configure their Qsales Toolbar they way they need it, we built a handy option (see cog above) to enable and disable features from the toolbar
Simply clear the checkbox beside any feature in the list above and that option will be removed form view.

Past Due Alert
No more selling to customers with overdue balances as a red or green notice will display on the toolbar indicating to your users the status of the customer’s account.

The Past Due Alert toolbar feature is configured to display the customer’s balance in a clear and visible way, with all overdue balances in excess of $50 displayed with a bright red background (STOP!), and all balances from Zero to $50 displayed with a green background.
The $50 default value can be changed in the Admin settings under “Misc”

2
THE QB DATA TAB
The QB Data tab is a high-level calculated summary of all the most important accounting fields for a customer, namely Balance and Past Due information, Average Sales Amount, Lifetime sales, First & Last Invoice, and various credit related details.

This accounting data is displayed differently than in other Qsales Tabs, as this one is entirely contained within the Contact table, and does not use custom tables.
This QB Data tab is also where we display the fields required for linking these contact records to customers in QuickBooks. Of note, the top left field called “QB ID” references the unique GUID of the linked customer in QuickBooks, and allows Qsales to sync the related transactional information ach night.
Fields like QB Customer Name and Record Type are self-evident, but QB parent ID is useful for nest a contact linked to a “Job” under the Parent Customer ID. The QB Primary Contact checkbox is useful for designating which contact amongst those linked to a Company is the primary one syncing to QuickBooks. When a number of Contacts are Linked to a Company in Act!, it may appear that all of them have QB Transactions and QB Data details, when in fact this information is only downloaded to one contact (the primary), and linked to the others.
FIELDS INCLUDED
Fields on the QB Data tab in ACT will be updated nightly with Qsync (Past Due amounts, Sales Totals, Last Invoice Date, etc.) based on the transactions that are downloaded to each contact.
By default, the QB Data tab includes support for up to five years of transactions broken down into monthly segments. We strongly recommend that you select all five checkboxes in the Build Fields screen, including the 4/5 Year totals.
LIST OF THE FIELDS BUILT BY THE QSALES BUILD FIELDS PROGRAM.
| FIELD NAME | FIELD DESCRIPTION | FIELD NAME | FIELD DESCRIPTION |
|---|---|---|---|
| QB_InternalID | Stores the QuickBooks unique ID | STTotal | Lifetime Sales total for data in the QB Transactions Tab |
| QB_PrimaryContact | Tag ACT contact for Contact Data Sync with QuickBooks | ST AvgSaleAmt | Avg Sales Amt for data in the QB Transactions Tab |
| STLastInvoiceDate | Last Invoice Date | QB_0-30 | A/R Balance 0-30 days |
| STFirstInvoiceDate | Date of First Invoice that exists in the QB Transactions Tab | QB_31-60 | A/R Balance 31-60 days |
| STcur-01 thru STcur-12 | Current Year Monthly Totals | QB_61_90 | A/R Balance 61-90 days |
| STcur-YTD | Current Year YTD Sales | QB_91 | A/R Balance 91-120 |
| STprev-01 thru STprev-12 | Previous Year Monthly Totals | QB_121 | A/R Balance 121 + |
| STprev-Total | Previous Year Total Sales | QB_Credit Limit | QB Credit Limit |
| STprev-YTD | Previous Year YTD Sales | QB_Past Due Total | QB Past Due Total |
| STprev2-01 thru STprev2-12 | 2 Years Ago Monthly Totals | QB_Terms | QB Terms |
| STprev2-Total | 2 Years Ago Total Sales | QB_Total Balance | QB Total Balance |
| STprev2-YTD | 2 Years Ago YTD Sales | QB_Account Number | QB Account Number |
| STprev3-01 thru STprev3-12 | 3 Years Ago Monthly Totals | QB_Rep | QB Sales Rep |
| STprev3-Total | 3 Years Ago Total Sales | QB_Type | QB_Type |
| STprev3-YTD | 3 Years Ago YTD Sales | QB_Price Level | QB Price Level |
| STprev4-01 thru STprev4-12 | 4 Years Ago Monthly Totals | QB_Last Payment Date | QB Last Payment Date |
| STprev4-Total | 4 Years Ago Total Sales | QB_Last Payment Amt | QB Last Payment Amount |
| STprev4-YTD | 4 Years Ago YTD Sales | QB_Notes | Notes form QB Customer Rec |
| QB_Contact | Contact field from QB Cust |
The QSales Field Builter utility will build all these fields, as well as the Custom Table in Act! called QSALESDATA and the associated fields to store the Invoice Detail information on the QB Transactions tab in ACT.
• STprev3 and STprev4 field sets get built when you choose the Years 4/5 option in our Build Fields program.
The Opportunity section of the build fields and QSales will build the following fields in the Opportunity table of ACT:
• QB_QBID: QB ID of the ACT contact linked to this Opportunity
• QB_TransID: QB Transaction ID when a QB Transaction is created from the Opportunity QB_Type The type of QB Transaction created (Invoice, Estimate, Sales Order, Sales Rcpt)
• Quoting4act, which is now a component of Qsales, also creates six Opportunity fields, and these are Quote Currency, Quote Number, Applicable Taxes, Deposit Require, Reposit Required Value, Shipping Cost, and Exchange Rate

MOBILE ACCESS TO FIELDS IN THE QB DATA TAB
In June of 2021, Keystroke added features to Handheld Contact that will give customers access to some of the vital accounting fields included in Qsales.
Handheld Contact now includes one-button accounting integration for both API and Classic products to support the syncing of essential accounting fields (see illustration above). These seven fields come standard with all Qsales for Act! installations, and include the fields you see listed below.
Both Handheld Contact API products have been updated, and are available for download from their respective online stores. The Windows Console for HHC Classic has also been updated. For the API products, these fields have been added to the current 75 custom fields available, while Classic has been configured to use seven of the remaining available fields for mapping.
The Qsales for Act! fields we selected include the following:
- Total Balance
- Past Due Balance
- Lifetime Sales Amount
- Payment Terms
- Credit Limit
- Last Invoice
- First Invoice.
Qsales has many accounting fields in the Contact table to choose from, but these seven have been blocked together for easy mapping based on their general day-to-day importance. Arm your users with the accounting data they need to better manage customers in the field. Integrate your Qsales accounting data in Act! with one click.
Available in both IOS and Android. Classic IOS has been updated but is waiting on AppStore approval.
QB TRANSACTIONS TAB – CONTACT LEVEL
The QB Transactions tab will display all of the QuickBooks transactions imported for a Contact or Company linked to QuickBooks. These transactions are displayed using custom table technology within Act!.
If you are working with a Contact linked to a Company, the data in the QB Transactions tab will be identical, whether you are on the Contact record or the Company record.
Note: The QB Transactions and QB Items Tabs will only display on workstations that have QSales installed.
QSalesData lets you import the following transaction types for customer records in ACT:
- Invoices, Sales Receipts, Credit Memo’s, Estimates, Sales Orders, and Payments
You can filter items on the Transactions Tab by any column visible, namely Date, Type, Number, Amount, Sales Tax, Due Date, Balance Remaining, Terms, PO, Rep, Status, Ship Via, Class, Customer Name.
Simply brush your mouse over the column header you want to filter by until the funnel icon appears, and then click on the funnel to display the available items to filter by. Keep in mind that the filters are contextual, meaning date fields will display date related options, and currency and numeric fields will display related options like number ranges.
When you click on filters for columns like Type or Class, you will see a list of options similar to the transaction types listed above.

Whichever options you filter by, those filtered variables will be displayed along the bottom of the QB Transaction Tab beneath the register. See below.

THE POWER OF QB TRANSACTIONS
As mentioned at the outset of this section, all the transaction records within this tab are managed with custom table technology inside of Act!. As such, certain features of custom tables can be used to manage the data for better insights. For instance, in addition to the column filtering discussed above, you can also right click at the bottom of any currency or numeric column enable numerous calculations like Sum, Min, Max, Avg, and Count.
GROUPING
Custom Table technology also offers the ability to group the data by any of the column information. Simply drag the column header to the grey row above and it will automatically group all the data by the values in that column.

For instance, if you wanted to see all the transactions broken down into “types”
In the image above, we dragged the type column header up to group all transactions into invoices, credit memos, payments, and sales Receipts. Once they’re grouped we can expand any of them to see the transactions segmented within each group.
If you have the Column “SUM” feature enabled, you can right click on it and change the “mode” to “Section” and it will display the Sum of each group you’ve expanded.
To clear the grouping, simply drag the column header in the above grey row back into the row below, and the grouping with disappear, displaying the full register as before.

EXPORT TO EXCEL
Users may find it useful to employ a number of filters to create a de facto customer statement. This data can easily be export to Excel and sent to a customer for their reference.

CUSTOMIZE COLUMNS
As with any list view in Act!, Qsales provides the ability to control the columns that are in view. Some columns are not always relevant to certain businesses. For instance, a business like Keystroke selling software would not need to see a “Ship Via” data column since all our products are downloaded. Other examples might be the “Terms” column for estores, where all transactions are COD. Whatever the case is for your business, we believe customers like choices, and the customize columns option provides one more.
In a team environment, the customize columns option is only applied at the user level, meaning one person’s preferences won’t affect the settings of another user.
After you click the “Customize Columns” button above, a window will popup to the right where you can drag-n-drop the unneeded columns into. Simply drag the column by the header and drop it into the box and your selections will stack up similar to the exampled below.


EDITING TRANSACTIONS
Editing transactions within the QB Transactions tab is only available to users with permissions to do so. Any Qsales user can drill into a transaction and see the details in read-only, but only those with write or full permissions will see the “Save” button at the bottom of the transaction, which allows them to commit changes.
• Invoices, Estimates, Credit Memos, and Sales Receipts
o All fields have write access, save for the Transaction Number & Payment Method fields, which are read only
o Credit Memos: All fields have write access, save for the Transaction Number, Terms, & Payment Method fields, which are read only
• Receive Payment is different, with only “Transaction Number”, “Date”, “Payment Type”, along with the items under the Add/Delete section should have write access. All other fields are read-only.
DELETE BUTTON
It’s important to understand that the Delete button within the QB Transaction tab only affects the records in Act!. If you delete a transactions in Qsales, it does NOT delete the corresponding transaction in QuickBooks.
Similarly, if you delete a linked Contact record in Act!, no data in QuickBooks is affected.

CONVERT TO OPPORTUNITY
The Convert to Opportunity feature is a real time saver for sales reps. If a customer makes a similar purchase request as they have in the past, the sales rep can find that previous transaction, select it, and click the Convert to Opportunity button to create an identical Opportunity as the previous transaction.

The new opportunity would bring over the products/services (as well as their corresponding quantities and values) and contact of that transaction, assign it a name based on the transaction number (which can be changed), and make the Opp open.
A sales rep can then go in and edit the value as needed, or simply convert that new Opportunity into a quote using the Qsales quoting feature (more on this later).
Once an Opportunity is closed-won, the sales rep can then convert that Closed Opportunity into a QuickBooks transaction at a single mouse click (more on this later).
QB TRANSACTIONS TAB – GLOBAL LEVEL
One of the new features we introduced with Qsales 12.1 was the Global View for QB Transactions located at the bottom of the Navbar. As this feature contains sensitive accounting information on the whole business, this option can be disabled from view for users within the Admin Settings.
Viewing all the transactions globally allows users to combine column filtering and column calculations to create a powerful reporting inside of Act! For instance, a sales manager could filter the transactions dates for the previous quarter, filter the types by Invoice and Sales Receipt, and the group the rep column to create an instant breakdown of what all of his sales reps sold the previous quarter. He could then even export it to Excel for further analysis.
Similarly a business owner can quickly see all their sales for a specific date range.

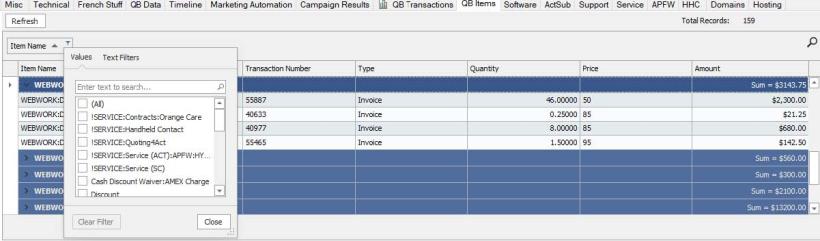
QB ITEMS TAB
The QB Items tab is another self-contained tab that displays all the products that particular contact purchased.
Unlike the QB Transaction tab, this feature is only visible at the Contact level, and it displays in report format all the products that contact has purchased.
As you can see from the illustration below, each product is displayed as an expandable group that contains all the transactions linked to that particular product. You can expand this group by clicking on the chevron at the left of each row.

Customers with extensive purchase history may require more filtering to be useful, so we’ve implemented an Item Name button that can be expanded to apply product filters as seen below.
Regardless of how the transactions are displayed, each of them are drillable, allowing you to click down to view or edit the related transaction (subject to your user permission).
Like the QB Transactions table, you can use column filters and values to refine your search and display your data in a more useful way.
The top right-hand corner displays the total records, or transactions involved in this report, and not the total number of products. As you apply filters, this number will change to reflect the transactions related to those filtered results.
EDITING FILTERS
The active applied filters are displayed at the bottom row in the QB Items Tab as indicated in the image below.

These filters can be cleared by clicking on the red X (see above), or edited at the far right of the same row with the “Edit Filter” button. When you click the Edit Filter button the filter properties popup in a separate window allowing you to edit them as needed (see sample below)

When you brush your mouse across an item filter a black X is displayed to the right of the item filter box. By clicking on the X you can clear a particular filtered item.
When multiple item filters are applied, it’s important to note the default setting is to apply the filters as an aggregate, and not as a narrowing filtering. What this means is it will search for any transactions that contain any one of the products, and not “all” of them in one.
When editing a multi-item filter, simply right click on the product you wish to remove and select “Delete” to remove it form the selection. The X will only be displayed at the end of filter line, and clicking on it will clear all the products, so be sure to only use this when that is your intention. Click the Apply or OK buttons at the bottom of the edit filter window to apply your changes, or click Cancel to restore the previous filter settings.

OPPORTUNITIES & QSALES
While Qsales delivers many accounting functions within the Contact table of Act!, it delivers even more CRM functionality within the Opportunity table. Qsales can actually create work flows that can save users a lot of time. Consider the following time-saving functions:
- Convert an invoice into an Opportunity
- Convert an Opportunity into a Quote
- Make the sale, and then convert that Opportunity into a new Invoice, sales receipt, sales order, credit memo, or even an estimate in QB
All these steps can occur without once duplicating effort, re-entering contact details or products/services. In a previous chapter we reviewed converting a past transaction into an Opportunity. As that leads us into this chapter, let’s start from there.
Once you convert a past transaction into an Opportunity, it will come across as “Open” with a name reflecting the transaction number you converted. Please change the name to something more appropriate, and then adjust the estimated close date (by default it is set to approximately one month from the open date). The “Process” will be whatever Process comes first in alphabetical order, with the stage being the first within that Process. The weighted probability will reflect the percentage linked to the first stage.
Since Qsales cannot decide which process, stage, weighted probability, and Estimated Close Date is appropriate for this new Opportunity, it will be incumbent on the user to update these variables based on their knowledge of the Opportunity in question.
Additionally, converting a transaction into an Opportunity does not limit any flexibility you have with that Opportunity. The user can still add or subtract products or services as needed, and change the quantity or rate, as well. Please note, transactions that have percentage discounts or upcharges may come across as zero quantity, and this will have to be updated to “1” to be reflected into the Opportunity total.
Once the Opportunity is converted, updated, and saved, you’re ready to convert that Opportunity into a quote, or another transaction. Let’s start by reviewing Converting to a Transaction
CONVERTING AN OPPORTUNITY INTO A TRANSACTION
The process for converting an Opp to a transaction is very straight forward. Simply click the down arrow beside the “Convert to…” button on the Qsales toolbar to display the available options, which are Convert to Invoice, Convert to Estimate, Convert to Sales Order, Convert to Sales Receipt, and Convert to Credit Memo.
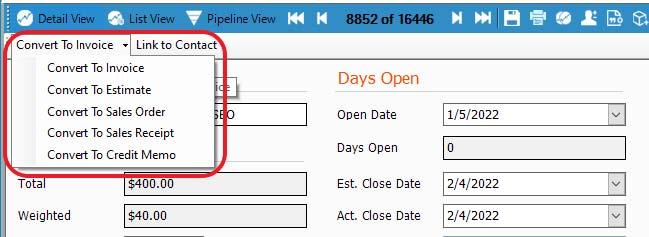
It is beyond the scope of this guide to suggest which transaction type to use, and since each choice has different accounting implications, you should get direction from your accounting personnel or Administrator as to which you should choose.
Once you make a transaction choice, the edit transaction screen will popup, and you can update the editable fields within it before saving. Once saved, that transaction will be written immediately to your QuickBooks file. Please click the “Refresh from QuickBooks” button on the Qsales Toolbar in the Contact Detail view toolbar to download that new transaction into Act!.
LINK TO CONTACT

It’s worth noting that only Opportunities that are linked to a Contact, which is in turn linked to QuickBooks customer, can be converted into a transaction. If you attempt to convert an Opp with an unlinked contact record into a transaction that process will fail for obvious reasons.
In such case, you can use the “Link to Contact” button (illustrated above) to connect the Opportunity to a Linked Contact. If the contact associated with the Opportunity is the intended one, but not linked to QuickBooks, you will need to toggle over to that Contact first, and use the appropriate Toolbar option to either convert that Contact to a new Customer, or Link them to an existing customer.
In the event multiple contacts are associated with an Opportunity, Qsales will take the first linked Contact in sequence and convert the transaction for that customer.
QUOTING4ACT
With the release of Qsales v12.1, a separate Keystroke addon called Quoting4act was integrated into Qsales. Quoting4act is a easy-to-use integrated quoting solution that works completely inside of Act!, and allows users to convert their Opportunity details into a quote at the click of a mouse. No more using 3rd party programs, cutting-and-pasting products & services, and then attaching separately to the Opportunity, Quoting4act makes rendering a quote a snap. This leaves your salespeople more focused on managing their pipeline and closing deals follow-ups than trying to publish presentable quotes.

QUOTING4ACT FEATURES INCLUDE
- Quote numbers are auto-generated each time
- Converts quote to PDF for previewing and sending
- Shipping and deposit amounts are easily configured on the fly
- Quoting4act inserts the Opportunity’s “Estimated Close Date” into the Quote as the Valid to date
- Saving the Quote to the Documents Tab is one click
- Switch from one currency to another at the click of a button, and add Foreign Exchange as easily as a sales tax
- Choose which products or services have sales tax applied to them with a checkbox
- All the quote details get saved to History automatically with the mail, but details like deposit, shipping, currency, and quote number are saved to the Opportunity fields so you can see them in the Opportunity Details, and even do look-ups by those same fields.

WITH QUOTING4ACT, THE PROCESS COULDN’T BE SIMPLER.
- Start by creating an opportunity, adding your products and services
- Once the Opportunity is complete, click Quoting4act to launch the Quoting Console (see illustration at the beginning of this chapter)
- From within this console, you can stipulate shipping fees, deposits, sales taxes, and even foreign exchange. The Quoting4act “Settings” allow you to embed your company’s logo, corporate colours, contact information, tax code, and disclaimer text to create a professional looking PDF quotation any company would be proud to present. (see above illustration)
- These details only need to be configured once, as they will be available for future quotations
- Once this information is configured, you can quickly preview the PDF quote, click to save the quote to the Documents Tab under the Opportunity, or click Send to delivery the quote to your prospect, which attaches the email and quote to the History (sample quote below). As an added bonus, any revisions you make to the quote can be saved to the Opportunity in the same fashion, showing you how the quote has evolved at each stage of the sales process.
- And that’s it! You’re ready for the next quote!

QSALES TOOLS MENU UTILITIES
Most of the Qsales utilities found under the Tools menu in Act! are covered in depth in the setup guide, but for reference, they are as follows:

QSALES FOR ACT! ADMIN SETTINGS
The Admin settings should not require much management after the initial setup and configuration. It should be noted that non-Administrators will not see this menu option. The only option non-Admin’s will see is as follows:

The single non-admin function is self-explanatory as users can choose to show or hide the Qsales Toolbar in the Contact Detail view. As this seriously limits the available functions, it is not recommended to hide this toolbar unless the user is strictly limited to viewing data.
As for the Admin functions, the changes that may be required on an ongoing basis after setup would be as follows:
- API settings tab does contain a useful utility for logging the API in and out of QuickBooks. This can be handy if Administrators need to get into single-user mode with QuickBooks to make changes, and then log the API back in easily.
- Permission settings is handy for making changes to user permissions as needed. By default all users are assigned read-only permissions, so administrators may wish to open this up as the users become more familiar with the program
QSALESDATA TAB INSTALL
This utility creates the QB Data in the Contact layout. This is not something that should be needed after initial setup unless you’re changing your layout. In such an event, simply run this utility, select the layout you want to update with the QB Data Tab and fields, and run. This process takes less than a minute.
CUSTOMER & VENDOR LINK & SYNC WIZARD
The Customer Link & Sync Wizard and the Vendor Link & Sync Wizard are very unlikely to be used after the initial setup because it is run in the beginning to mass link contacts to customers, or to mass create customers from contacts. Short of a big import of new customer or vendor data into Act!, this should not be a feature you use often.

In the event of a big import of new data, we recommend you configure the QB email field to match on the Act! email, as the image below indicates.
Once this is done, click Load Unlinked Contacts. Depending on the amount of unlinked contacts there are in the database, this process can take 1-10 minutes approximately. Once that is done, you can review the results, as the screen below will show all the recommended actions for each suggested contact link. Once you’re satisfied the correction actions are set for linking, click the Process button at the bottom to complete this process.

INSTALLATION WIZARD
The last Qsales Admin option under the Tools menu is the Qsales Installation Wizard. As the name suggests, this Wizard should only be used during the initial setup, and it contains many of the functions listed under the Tools menu, and previously discussed.
Since this wizard is extensively covered in the setup guide, we won’t elaborate much on the details of it, other than to say the opening screen includes two options that should be understood.

NEW OR EXISTING DATABASE?
The first is whether you’re installing Qsales into an existing production Act! database, or a new empty one. This choice is important because the user will be presented different options during the Setup Wizard based on the choice made here.
Selecting the existing database will invoke the Link & Sync Wizard covered in the previous chapter. Selecting the New Act! database will launch the feature that takes the Customers & Vendors in QuickBooks and creates them as Contacts in the Act! database. As there is no deduping option during this process, we recommend only using this for empty databases.
SHOW THE WIZARD AT STARTUP
After the initial plugin installation, the Qsales setup Wizard is configured to run with each Act! startup. Once the setup is completed, users can check the box in the bottom left corner of the wizard (as indicated in the image above) to prevent the Wizard from launching again with startup.