MailManager4Act Manual
Key Components
Opt-In Manager
- Send Optin Emails to Contacts and update the Contact permissions in the database with 1 click.
- Lookup Contacts in the database based on email list
- Lookup Contacts in the database based on bounced email messages stored in an IMAP folder
- Add footer at bottom of email merges with automatic unsubscribe link
- Excluded from MailMerge4Act Edition
MailMerge
New Features
- merge to PDF
- merging of data from Opps, Companies, and Groups
- in the settings > email delivery, you can select custom email fields.
- Create/Edit Templates in Rich Text Editor
- Convert Native Act Templates using Template Converter
- Merge To Word
- Merge To Email
- Send Email From Stationery
- Schedule Email blasts
- MailManager4Act Manual
- Key Components
- How to set up MailManager4Act
- Creating/Editing Templates in MailManager4Act
- Convert native Act! Templates to MailManager4Act Templates
- Sending Opt-in emails to Contacts with MailManager4Act
- Generate the Opt-in link manually without sending email from template in MailManager4Act
- Updating Contact Opt-in permissions in the database
- Merge template to Word in MailManager4Act
- Merge template to E-mail in MailManager4Act
- Sending email from stationery settings
How to set up MailManager4Act
In order to use MailManager4Act, a custom field and dropdown menu must be created. This operation can only be performed on the machine hosting the database.
If you are hosting the Act! database on your own machine, please install MailManager4Act on your computer and proceed to the Permission Field Setup section below. If your Act! database is hosted on a different computer such as a server, or shared PC, then you will need to perform the Permission Field Setup on a machine that has direct access to this server. If your database is hosted by a third party hosting company and you are using a remote database, please contact your hosting provider so they can assist you with the initial set up. Once the steps in the Permission Field Setup section have been performed, you may move on to the Configuration section below.
Note: Please create a backup of your database prior to beginning with the initial setup section. If you previously had MailMerge4Act, or OptinManager installed, please uninstall them prior to the install in order to avoid any conflict issues.
Permission Field Setup
- Install MailManager4Act on a workstation machine that has direct access to the server hosting the database.
- After logging in to Act!, you will be presented with the MailManager4Act activation window. Enter your license key and click the Add button to add your Act user to the licensed users list. Otherwise, simply close this window to continue in trial mode.
- Click the menu MailManager4Act > MailManager4Act Settings
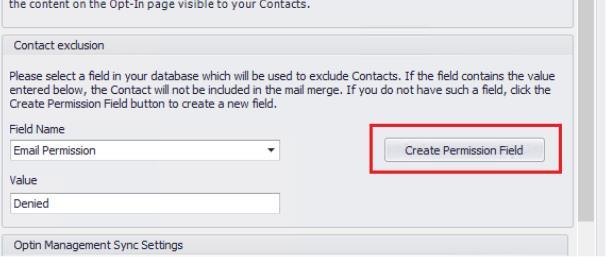
- You can either create a new permission field by clicking the Create Permission Field button, or if you already have a character field in the database that you have used previously to record Contact permissions, select this existing field from the Field Name dropdown menu. In the Value field, type in the value that MailManager4Act will use to ignore Contacts from email blast. If you clicked the Create Permission Field button, by default this value will be “Denied”
- Once the field is created, please add the "Contact Permission" field to your Contact layout.
Adjusting Contact Layout
The Act Contact layout can be modified by users with roles of "Manager" or "Administrator". To add a field to the Contact layout, follow the steps below:
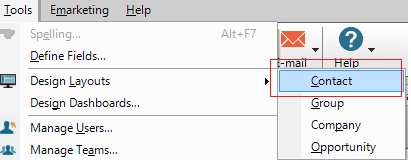
- Click the menu Tools > Design Layouts > Contact. This will open up the layout editor and your current layout will be made available for editing.
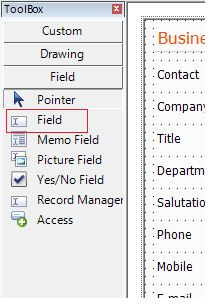
- When the layout editor loads, click the Field button from the toolbox on the left side of your screen.
- Next, click on an area of your layout where you want to place the new field. This will open up a popup window with a list of available fields. In this example, we will click just below the Referred By field. Note: You may only add a field to the layout once.
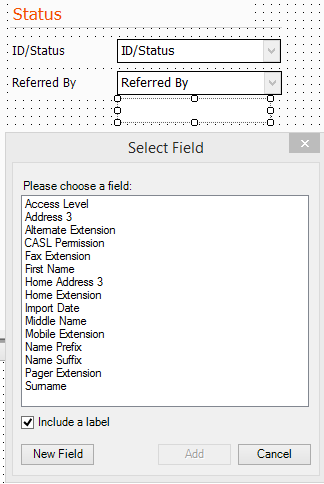
- Select the field from the list and press the Add button.
- You may now drag and drop the field or the field label to the position of your liking.
- Once you are happy with the placement, close the Layout Editor window, and press Yes to save your changes.
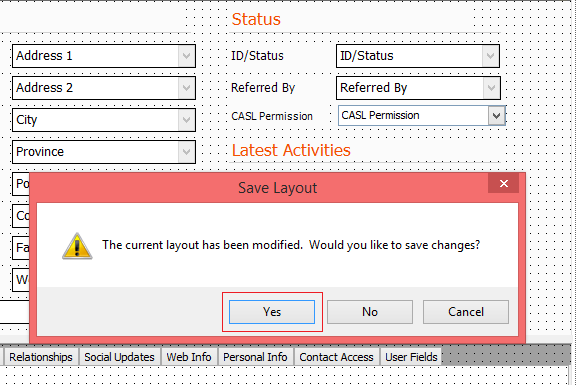
- Once the layout editor is saved and closed, you will see the field on your Contact layout.
Note: This concludes the schema set up portion of this guide. If you have remote database users in your environment, please instruct them to synchronize their remote database. Once that is completed, they may continue with the section below since the field will be created for them during the synchronization.
OptinManagement Account Configuration
- Click the menu MailManager4Act > MailManager4Act Settings
- Click the Create Account link in order to create an account on optinmanagement.com.
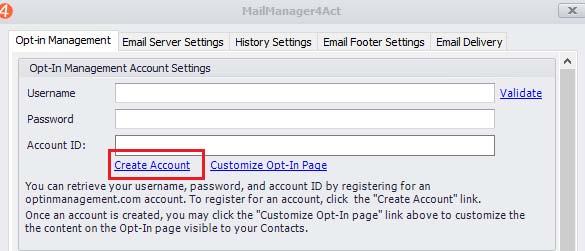
- Once the account is created and confirmed, enter the Username and Password in the fields above.
- In order to retrieve the Account ID, click the Customize Opt-In Page link above, which should launch your webbrowser to optinmanagement.com. Log in again if required.
- Click the Copy button on the web page.
- While on the Customize web page, enter in your Company Name, website URL, and upload a Logo for your company. If you are uploading a logo, please remember to hit the Upload button or else the logo may not be saved correctly. Your current logo will be displayed under the Preview label.
- You may also enter some text in the Message Text field which will be displayed to your users when they click the link in the emails sent via the Optin Management menu in Act, which will be discussed in more detail below.
- Once completed, click the Save button on this web page to save your settings.

• After copying the Account ID from the web page above, paste this ID in the Account ID field in Act. • Click the Validate link in order to check your credentials and Account ID.
Email Server Settings
- Click the Email Server Settings tab and enter your Email server settings. MailManager4Act requires an SMTP connection in order to send emails to the Contacts. If you are unsure of these settings, please consult with your Email Administrator and they will be able to provide you with these connection settings. If you are using a popular 3rd party email provider such as Office365 or Gmail, you can do a web search and find these SMTP settings easily. For example, see the following article for Office365 based email accounts: https://support.office.com/en-us/article/how-to-set- up-a-multifunction-device-or-application-to-send-email-using-office-365-69f58e99-c550- 4274-ad18-c805d654b4c4
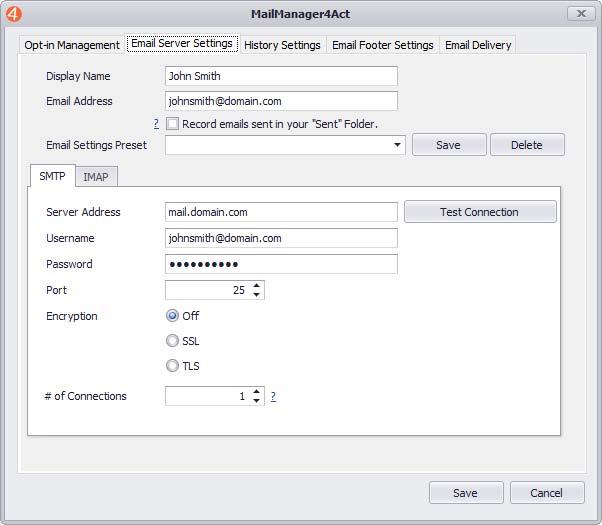
- If you wish to record the emails sent by MailManager4Act in the Sent folder of your email account, enable the Record emails sent in your “Sent” Folder checkbox and enter in your IMAP server information in the IMAP tab as well since the SMTP service alone does not have access to your account’s IMAP folders. Keep in mind that enabling this option will increase the time it takes to send each email and increase the size of your mailbox over time therefore we only recommend enabling this option only if needed.
Email History Settings
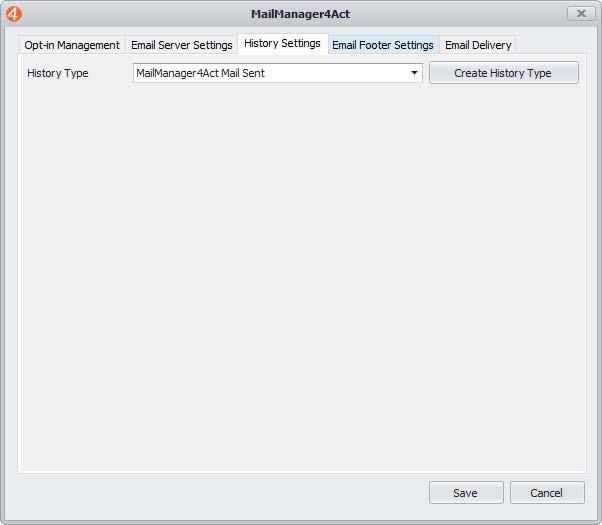
- Click the Create History Type to create a custom history type in your database that will be used to record email messages to the history tab. We highly recommend using a custom history type rather than the generic “Email Sent” as doing this will make filtering by history type very easy later on if you ever wish to do database cleanup or auditing. If you wish to use another history type, select it from the History Type dropdown menu.
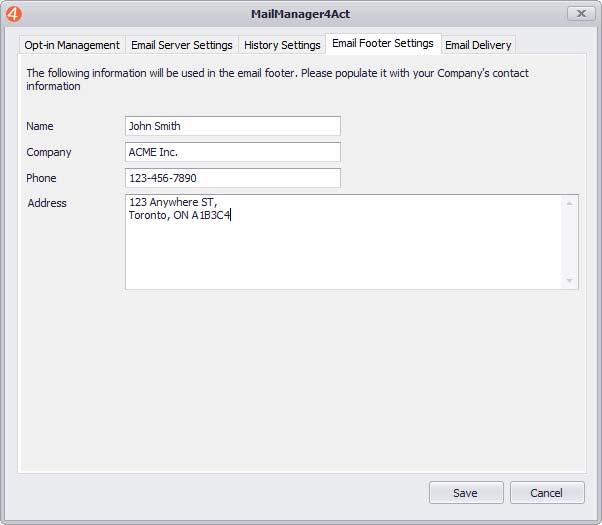
- Click the Email Footer Settings tab.
- If you would not like MailManager4Act to generate an email footer with an unsubscribe link, enable the Hide MailManager4Act footer checkbox.

• Enter your company's contact information in the fields provided. This text will be used to generate the footer of the email blasts.
- If you wish MailManager4Act to use all Contact email fields when sending out email blasts, click the Email Delivery tab and enable the Use all Contact email fields checkbox. This will make sure that when a Contact is sent an email, they will receive it on not only their main email, but also on any other recorded email addresses in the database, such as Alternate Email, Personal Email, etc. However, for most scenarios, we recommend leaving this option disabled.

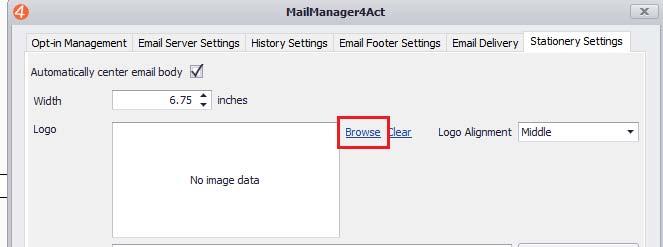
- Click the Stationery Settings tab, to change the text that will be used when you select the Send From Stationery option.
- If you wish the email body to be a fixed width and be centered, enable the Automatically center email body checkbox and enter a value in the Width field. The default value for width is 6.75 inches but this value can be changed as needed.

• If you require your logo to be displayed at the top of the email, click the Browse button as shown below and select your logo image file. Using the Logo Alignment dropdown, you can position the logo to the left, middle, or right of the email.
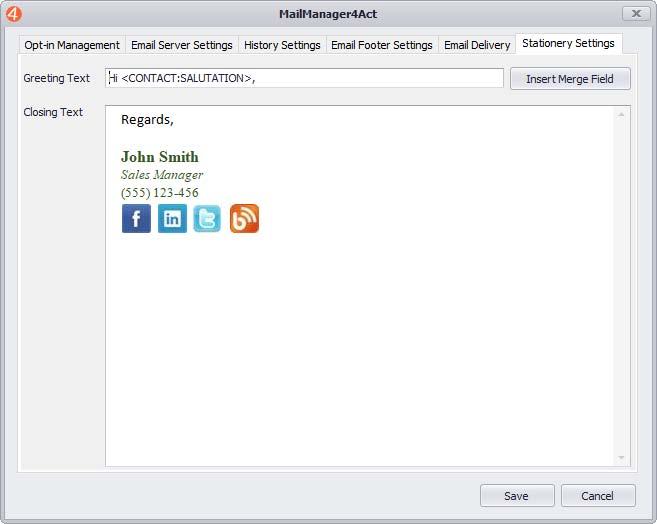
- Modify the Greeting Text if needed. Click the Insert Merge Field button if you wish to include any fields from your database other than the default of Salutation.
- Enter your signature in the Closing Text textbox. In most cases, the most convenient option would be to copy your email signature from Outlook and edit it as needed.
Configuring Webform Settings
- MailManager4Act can also allow the users to generate webforms which can be linked to from a website. Once Contacts fill out these webforms, MailManager4Act can download these submissions and automatically add/update Contacts in the database. If you wish to enable this functionality, please follow the steps below.
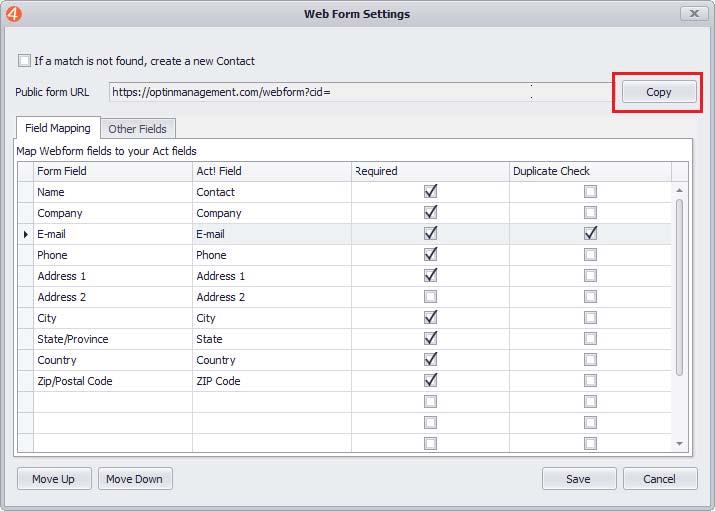
- Click the menu MailManager4Act > Webforms > Webform Settings
- Click the Copy button to copy the webform URL. You can place this link on your website for your Contacts to fill out.
- Map the Form Field with your Act Fields. If you do not wish for a field to be included in the form, you may clear out the Form Field and Act Field columns.
- Enable the Required checkbox for required fields and the Duplicate Check checkbox for fields that will be used to check for duplicates in the database. By default, only the Email Field will be used to check for duplicates however you can enable multiple fields if required. Note: Fields that have duplicate check enabled must also be marked as Required
- If you wish the webform to create Contacts in the database if a match is not found in the database based on the Duplicate Check column, enable the If a match is not found, create a new Contact checkbox, otherwise leave this option disabled. If disabled, any submissions that do not match existing Contacts in the database will be deleted.
- Click the Other Fields tab. Enter a n email address in the Contact Us email Address field. This email will be present near the bottom of the webform which the users can click on to submit any additional questions.
- Enter your company address in the Company Information field.
- Enter any additional comments in the Comments field which will be displayed neat the bottom of the webform.
- Once satisfied, click the Save button to save your changes to the server.
Creating/Editing Templates in MailManager4Act
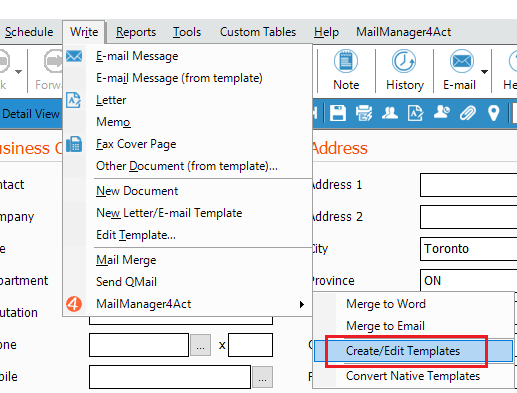
- You can access the template editor by clicking the menu Write > MailManager4Act > Create/Edit Templates
- Once the template editor opens, a "Open File" window will be opened automatically which will let you pick an existing template. If you wish to edit an existing template, please browse to and open that file. Otherwise, close this window in order to create a new template
- The Insert Merge Field window will also be automatically opened. Click the Record Type dropdown to select the table that you wish to use to insert fields into the template which will populate the Field Name list below. You may simply double click one of these fields to add them to the template, or alternatively highlight one of them and click the Insert button.
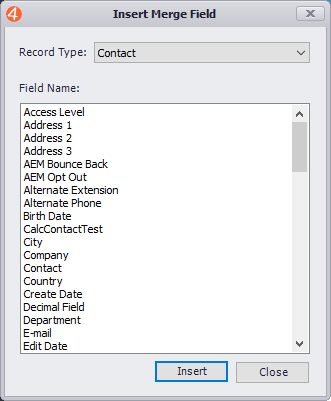
- if the Insert Merge Field window above is accidently closed, you may re-open it by clicking the Insert Merge Field button on the Home tab of the template editor.

- The editor is fairly similar to popular editors such as Word and most regularly used features are available in similar tabs.
- Once you have completed the template, click File > Save As to save a new template, of File > Save to update if editing an existing template.
Setting Template Width
- Templates created using this template editor will take up 100% of the email window by default. If you wish to have a fixed width for your email, create a table by clicking Insert > Table and enter 1 for the number of columns and rows.

- Right click anywhere inside the table, and click Table Properties
- Enable the Preferred width checkbox, and enter a value in the texbox beside it. We recommend starting with a value of 6 inches and increasing/decreasing it as needed. Ensure all your template content is included inside this table in order for the width settings to apply.
- In order to hide the table border, click the Borders and Shading button, and select None for the border.
Convert native Act! Templates to MailManager4Act Templates
- If you have one or more existing templates in the native Act! template format, you can easily convert these to the new MailManager4Act format using the template converted. Note : the feature below requires Microsoft Word 2010 or higher in order to function.
- Click the menu Write > MailManager4Act > Convert Native Templates

- If you wish to convert only 1 template, click the Single template file option and browse to your template file. If you wish to convert all your native Act! templates, select the All files in a specified folder option, and browse to the folder you wish to use. By default, this folder will be your Act! database's Templates folder.
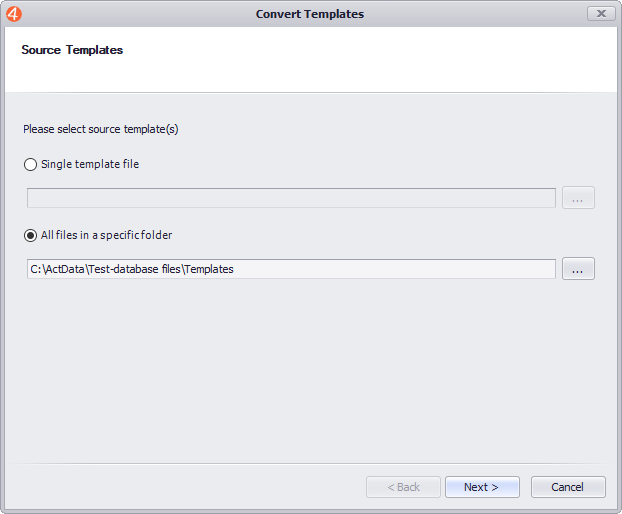
- Click Next to proceed through the wizard and convert the templates. The selected templates will be converted to the new format. You may now use these templates to send out email blasts using MailManager4Act, or edit them using the Template Editor.
Sending Opt-in emails to Contacts with MailManager4Act
- Prior to sending the emails, perform a lookup of Contacts that you wish to send the emails to. In order to test this function, we recommend looking up your own Contact record by clicking the menu Lookup > My Record
- Click the menu MailManager4Act > Optin Management > Send Emails
- In the following window, enter the Email Subject, Hyperlink Text, and Closing Text. A sample for these values is included in the screenshot below. Once satisfied, click the Refresh Preview button to preview your changes.
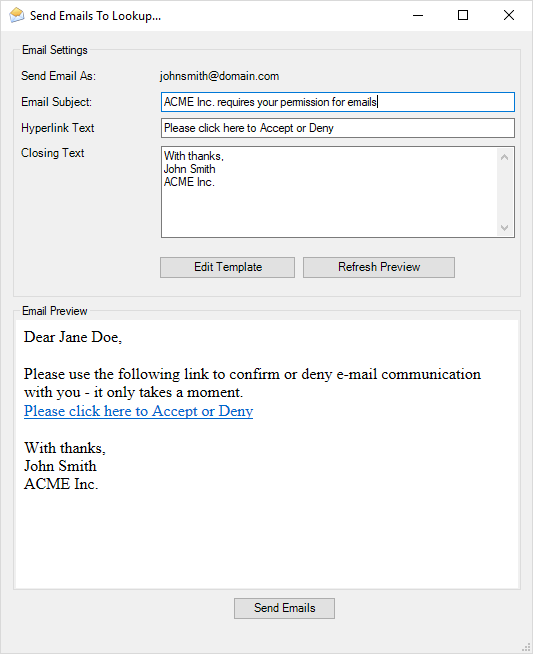
- If you wish to edit the body of the email, click the Edit Template button, which should open the template in notepad. Keep in mind, that this is a plain-text email so no images or HTML formatting is allowed.
- If you wish to insert some data from your Act! fields, enclose the field name in angled brackets. For example, we added the field E-mail in the template below so that the Contact's email address is included in the template
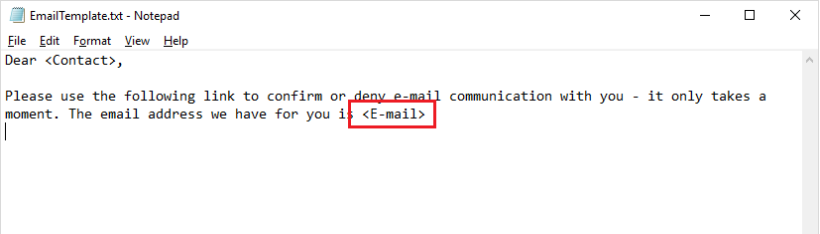
- Once satisfied, click File > Save and close notepad. Click the Refresh Preview button to view your changes.
- To begin sending emails, click the Send Emails button at the bottom of the window.
- Select Current Contact, Current Contact Lookup, or All Contacts based on your needs. As mentioned above, we highly recommend testing with your own Contact prior to sending the emails to other Contacts in the database.
- Click OK to send the emails.
- MailManager4Act will now go through the selected Contacts and send out the emails. Note: MailManager4Act will only process Contacts that do not contain any data in the Email Permission field defined in the MailManager4Act Settings. This is to prevent unintended spam. If a Contact has already Accepted or Denied, there should be no reason to send them another Optin Email. If you wish to send another email for testing purposes, simply clear out the value inside this field manually.
- Once the Contacts click the link in the email, they will be directed to our site which will record their choice.
- The Contacts choices can then be downloaded to your Act! database by running the Update Contact Permissions command.
Generate the Opt-in link manually without sending email from template in MailManager4Act
- Using the menu option MailManager4Act > Optin Management > Send Emails command, your Contacts will be sent a unique link which they can use to submit their Opt-in/Opt-out requests. If for some reason, you wish to generate a link for the Contact without sending them an email using the process above, click the menu MailManager4Act > Optin Management > Generate Unique Link
- This will copy the unique link to your clipboard for the current Contact that is in your detail view.
- You can now paste this link in a separate email and send it to your Contact directly. This feature is useful if there was an issue with the original Opt-in email and the Contact was unable to submit their request.
Updating Contact Opt-in permissions in the database
- Once you have sent your Contacts an Opt-in request email, you can download their choices by clicking the menu MailManager4Act > Optin Management > Update Contact Permissions
- We recommend running this command at least once a week in order to update your database so that all Contact permissions are downloaded. For security reasons, these submissions will be removed from our server once they are downloaded on your database.
- The Email Permission field will be set to Accepted or Denied based on the Contact's choice. Moreoever, a History record will also be generated which will record the Contact's choice.
Merge template to Word in MailManager4Act
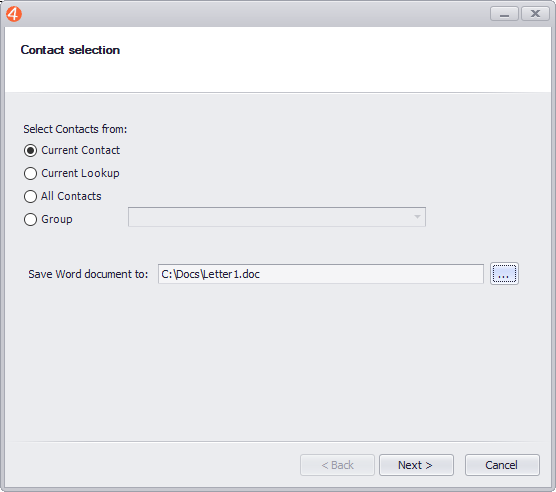
- Perform a lookup of Contacts that you wish to send the letter to
- Click the menu Write > MailManager4Act > Merge to Word
- Select a template file and hit Open
- In the Contact selection screen, select which Contacts will be processed by MailManagfer4Act. If you already have a Group set up in Act with the required Contacts, click Group and select the Group name from the dropdown menu.
- In the Save Word document to field, browse to a location where the document will be saved to and click Next
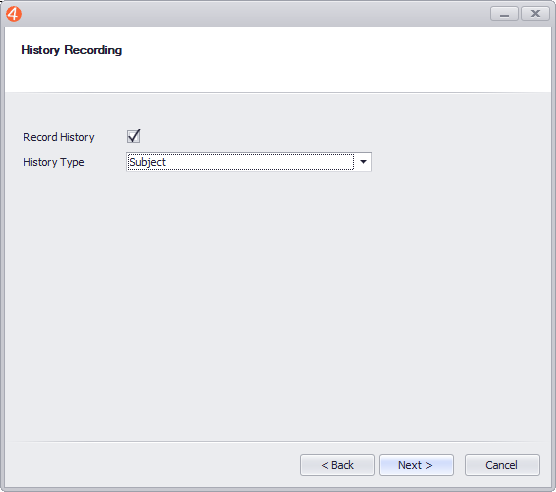
- On the History recording screen, enable the Record History checkbox if you wish to record the content of the letter to the Contact's History.
- Click Next to proceed with the Merge to Word.
- Once complete, MailManager4Act will automatically launch the final Word document.
Merge template to E-mail in MailManager4Act
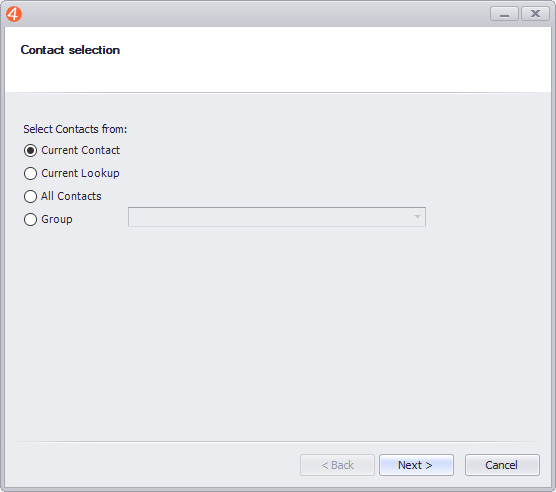
- Perform a lookup of Contacts that you wish to send the letter to
- Click the menu Write > MailManager4Act > Merge to Email
- Select a template file and hit Open
- In the Contact selection screen, select which Contacts will be processed by MailManagfer4Act. If you already have a Group set up in Act with the required Contacts, click Group and select the Group name from the dropdown menu.
- In the Save Word document to field, browse to a location where the document will be saved to and click Next
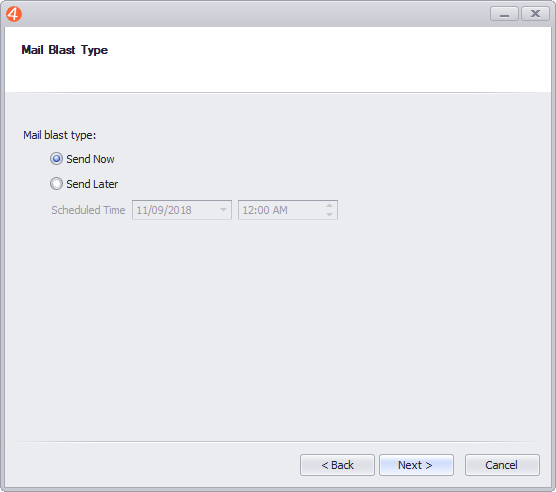
- On the Mail Blast Type screen, select Send Now to send the email blast now. If you wish to schedule the email blast at a later date/time, select the Send Later option and and the date and time in the Scheduled Time fields. Note: If you schedule the email blast for a later time, please ensure Act is logged in and running at the scheduled time otherwise the email blast will not be sent.
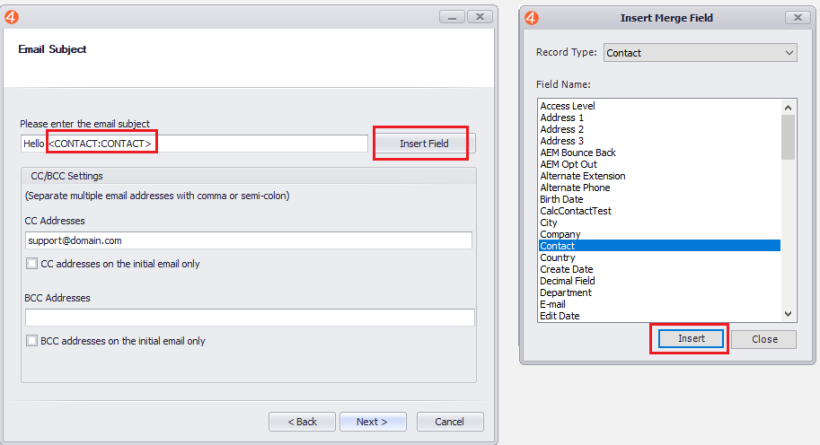
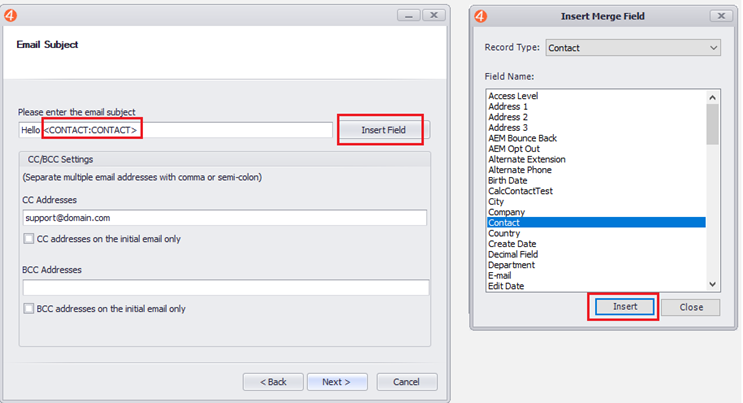
- On the Email Subject screen, enter an email subject for the email blast. If you wish to merge the values from one or more fields in your Act database, click the Insert Field button which will open the Insert Merge Field dialog. Select the field you wish to insert and press the Insert button to add the field code to the subject. For example, we added the Contact field in the screenshot below, which added the code CONTACT:CONTACT to the subject line.
- In the CC addresses section, enter an email addresses that will be copied to the email blast. Multiple email addresses can be separated by using a comma.
- You may also enable the CC address on the initial email only checkbox if you only wish to CC on the first email only. The same can be done for the BCC Addresses section.
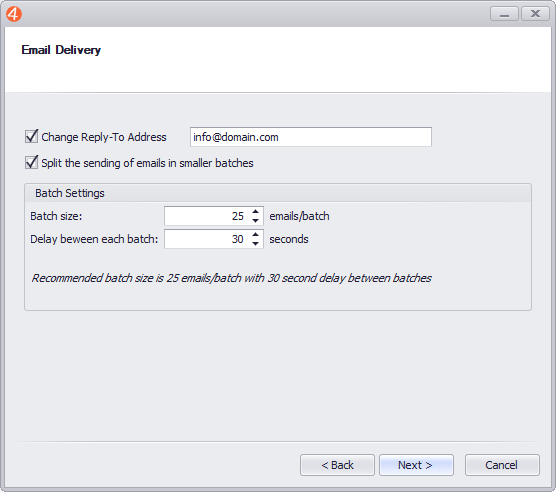
- On the Email Delivery screen, if you wish to change the reply-to address of the email, enable to Change Reply-To address checkbox and enter a new email address in the field. This way, when a user replies to the email blast, their response will go to the email address listed instead of the one used to send out the email.
- Enable the Split the sending of emails in smaller batches option if you wish to slow down the sending of emails in order to overcome any anti-spam restrictions set up by your email host. We recommend checking with your email administrator in order to confirm the correct values. For most applications, a delay of 30 seconds and a batch size of 25 will generally work. If you are using a service optimized for email delivery such as SendGrid, you do not need to enable this setting.
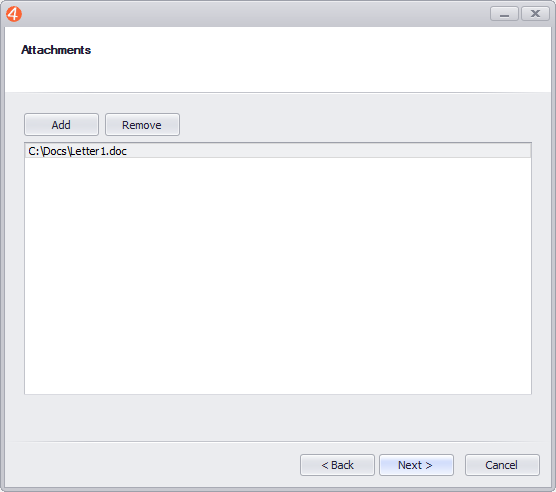
- If you wish to include any attachments in the email, click the Add button on the Attachments screen and browse to the files you wish to include. Otherwise, press Next
- On the History recording screen, enable the Record History checkbox if you wish to record the content of the letter to the Contact's History.
- Press Next to begin the Merge process or save the scheduled email blast if you enabled the Send Later setting.
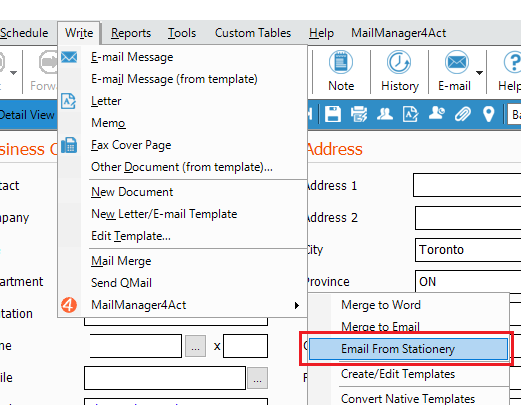
Sending email from stationery settings
- Click the menu Write > MailManager4Act > Email from Stationery
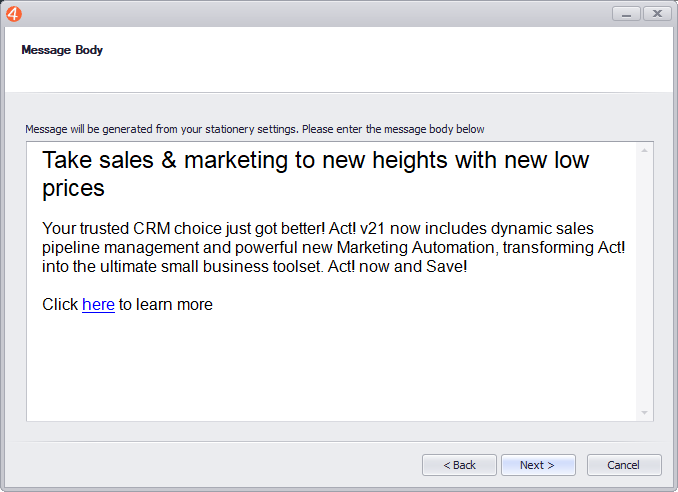
- The function of this menu option is identical to Merge to Email. However, instead of selecting a template, the email will be generated using your Stationery Settings as discussed earlier in the manual.
- Proceed through the wizard as explained in the Merge to Email section.
- You will see a new Message Body screen, where you can enter the content of your email which will be placed between the Greeting Text, and the Closing Text as defined in the MailManager4Act Settings.
- Click Next to proceed through the wizard and Send/Schedule your email.