Keystroke Contact Manager - Windows
- Keystroke Contact Manager - Windows
Before you begin
Please make sure you have the following information:
- Web API address of your Act! database
- Name of your Act! database
- Your Act! username
- Your Act! password
Installation and API Connection
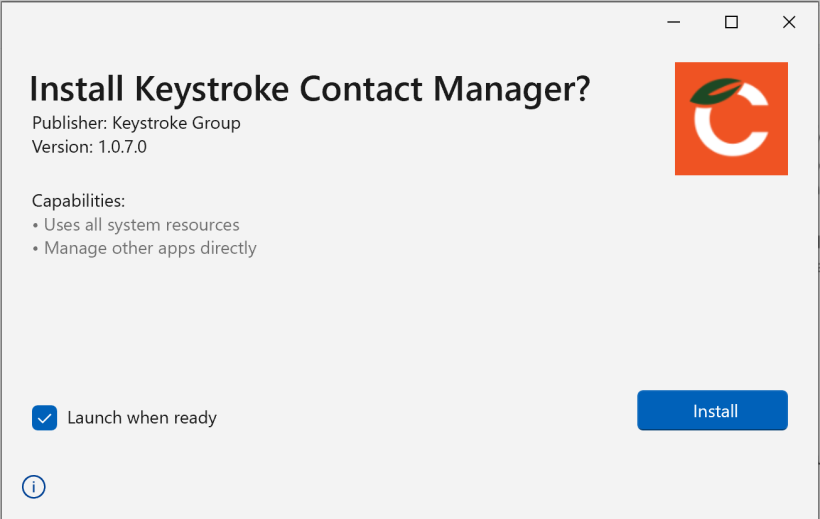
Download the installer windows-latest.msix from https://www.act4work.com/files/KeystrokeContactManager/ and run it.
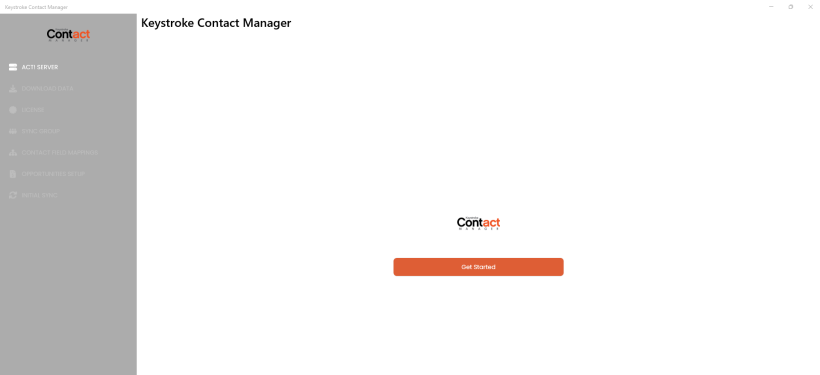
Install process by default launches Keystroke Contact Manager, and leads you to 'Get Started' screen.
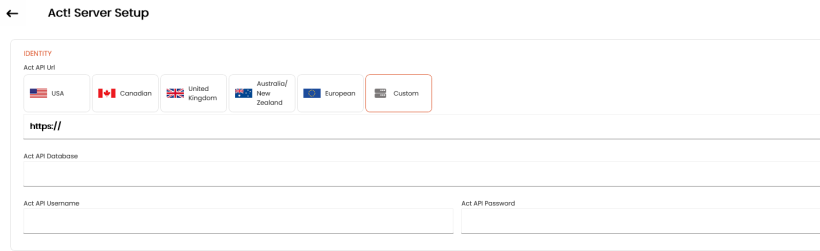
To connect to your Act! database, you will need to select the URL of your database API based on your geography, or provide custom URL. If you are using Act! Premium Cloud in the US, you can simply click the American flag. You will also need to enter database name, your username, and your password.
Sync Settings and Process
Sync Group(s)
Keystroke Contact Manager will provide you with the listing of groups available in Act! for syncing. If not already available, it is useful to set up a Sync Group in Act! which is based on dynamic settings, such as 'Account Status' equals 'Active'. For large databases, it can be useful to also limit the group to the contacts where the user is the 'Record Manager'.
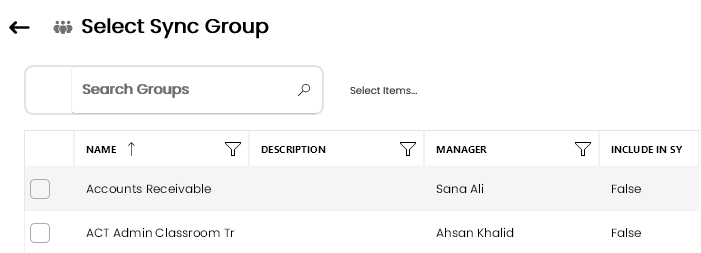
If you are working with several groups, you can to select multiple groups to sync.
Sync progress popup will report on the progress of syncing all selected groups.
You will only obtain Act! data for the group(s). If you later decide to change your selection, you can do so by going to SETTINGS in the left navigation, and selecting SYNC GROUP. You may decide to create a special group in Act! which will collect together the contacts which best fit the uses you anticipate in the Keystroke Contact Manager.
Deciding Whether to Sync Opportunities, Histories, and Notes.
Depending on what part of Act! data you expect to use, you will be prompted to include, or exclude Opportunities, Histories, Notes, and QSales Summary Fields. 'Display QSales Summary Fields' option will only appear if Keystroke Contact Manager detects the presence of QSales data in your database.
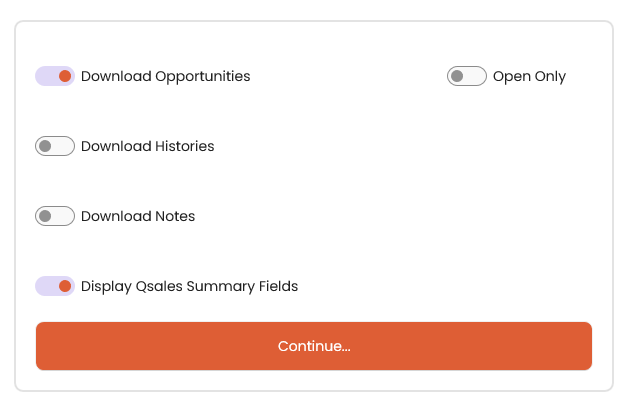
For large databases, it is a good practice to sync Opportunities ('open only' or all - based on your needs) but to avoid syncing Notes and Histories because they add a lot of extra time to your sync, and are not typically searched separately, rather they are browsed in the contact's History and Notes tabs. When you access History and Notes tabs under a contact, the notes and histories will be downloaded for you for that contact selectively.
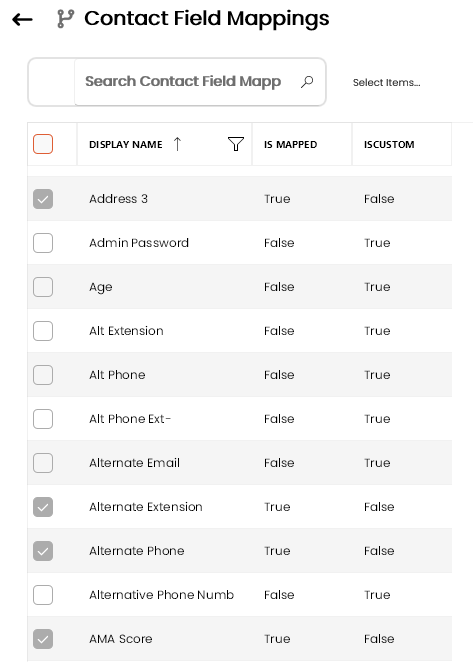
Contact Field Mappings
You will also be able to select Act! fields which you require on a regular basis. Most commonly used fields are pre-selected as a default
Contact Field Mappings - QuickBooks through QSales
If your Act! database integrates with QuickBooks through QSales, Keystroke Contact Manager will give you the option to sync QSales summary fields which are custom fields in the Contacts table. These fields are meant to give you a quick idea about the payment status of the customer by showing you values such as Past Due Balance or Last Payment Date. Transactional information, such as all invoice numbers, dates, or payment amounts are not currently synced into Keystroke Contact Manager. Adding this functionality may be considered based on customer demand.
Opportunity Field Mappings
You will also be able to select Act! fields which you require on a regular basis. Most commonly used fields are pre-selected as a default.
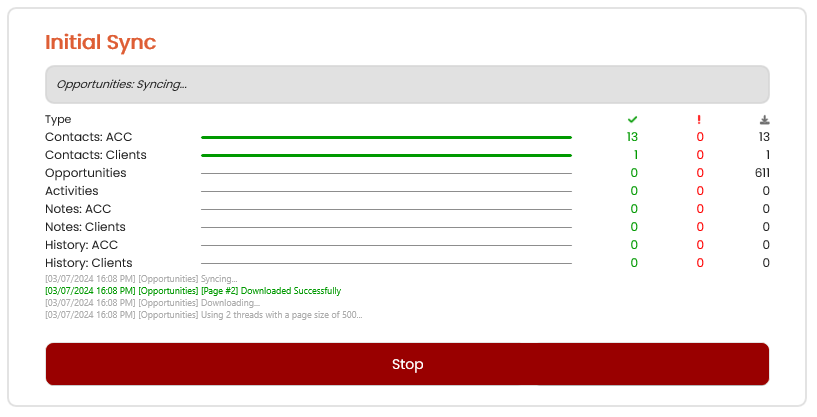
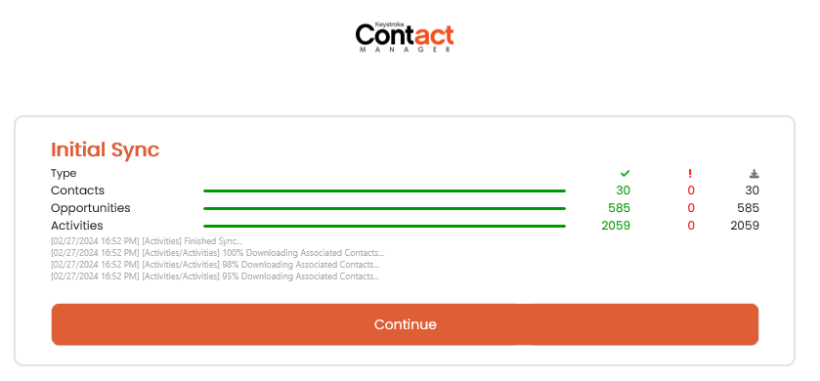
Initial Sync
With all your settings in place, you will be prompted to start the initial sync.
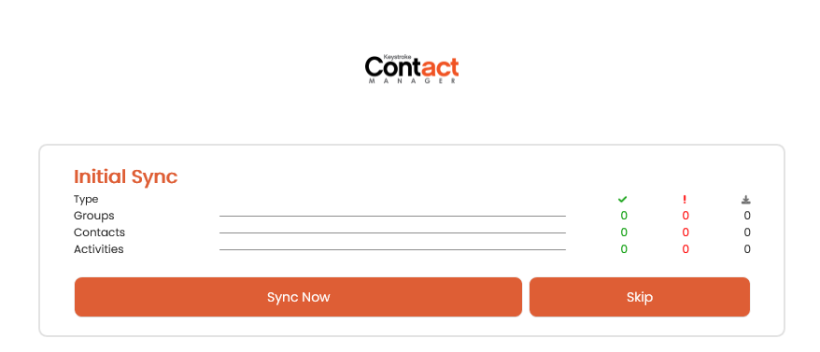
The program will keep reporting on its progress.

Once the is complete, a Continue button will lead you to your Dashboard
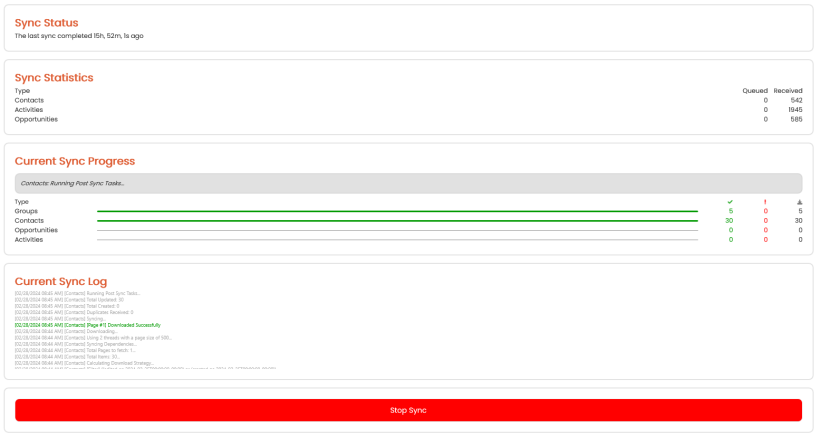
Updating Syncs
Going forward you will be able to update your data by going to SYNC NOW button in the Dashboard, or selecting SYNC STATUS from left navigation, and then SYNC button. The app will let you know how much time has elapsed since your last sync, and then provide you with a detailed report of the sync.
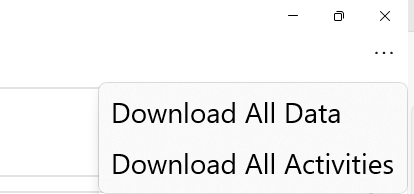
Download All Data
While standard updating sync is faster because it looks for changes in your data, and only updates relevant records, you have the option of executing the equivalent of the initial sync by clicking the three dot menu in the top right corner of the SYNC STATUS screen, and then selecting DOWNLOAD ALL DATA.
Sync Log
Clicking into the text reporting a completed sync, will allow you to copy the report into your clipboard. This allows you to paste the log into an email or a text file and give technical support required details should you experience problems.
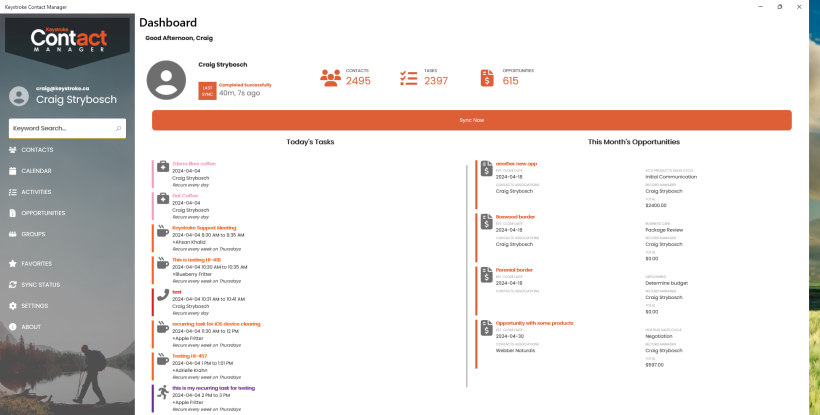
Dashboard
The Dashboard is an overview screen which has summary of the most recent sync, as well as listing of the Today's Tasks, and the Opportunities for the month. It does not have its own entry in the left navigation but using return arrows in other areas of the app will bring you back to the Dashboard.
Contacts
List View
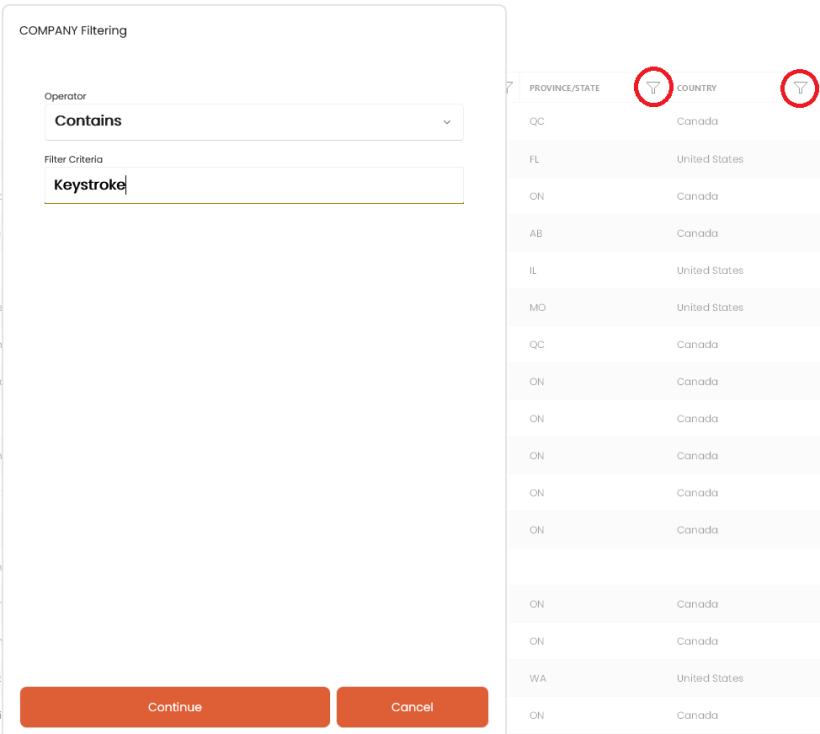
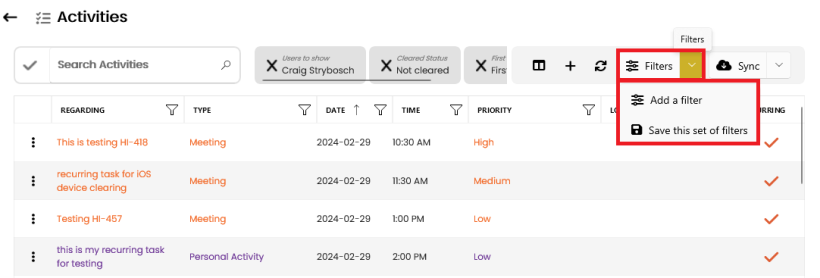
Default view for the contacts is a List View. It offers filtering and sorting. You can sort contacts by clicking the title of the column you wish to sort by. If you would like to filter and query by field data, simply click the funnel icon next to the title, and the filtering options will be made available.
The Sequence of columns can be adjusted by dragging and dropping column headers. Selection of the Columns can be adjusted using column picker in the top right menu.
Common Filters
Some popular common filtering options can be accessed from the top menu.
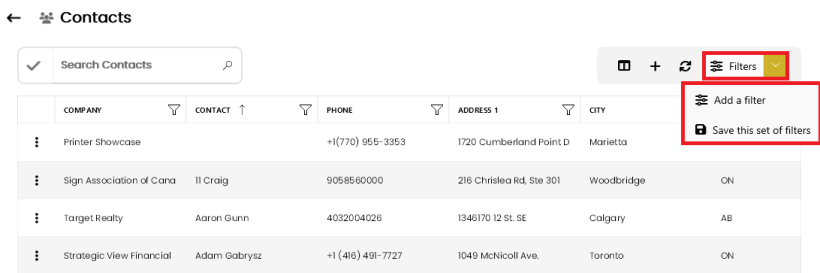
Filters applied to your set appear in gray area. To remove the filter, simply click into the area.

Footer with a Counter
The footer with the counter at the bottom of the list view will adjust to either your entire set or to filters you will select.

Action Menu in the List View
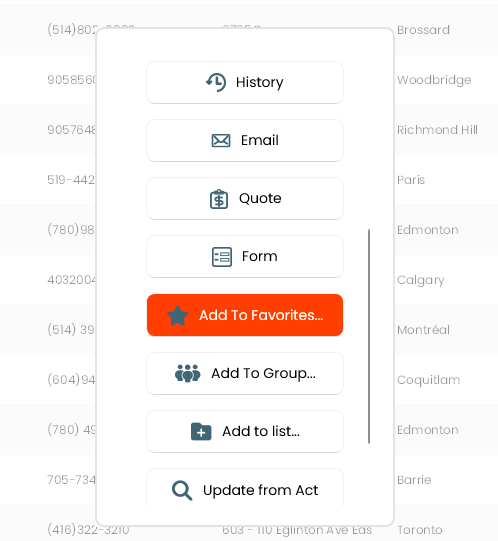
In the beginning of each row, three dots will allow you to surface action menu for the contact record.
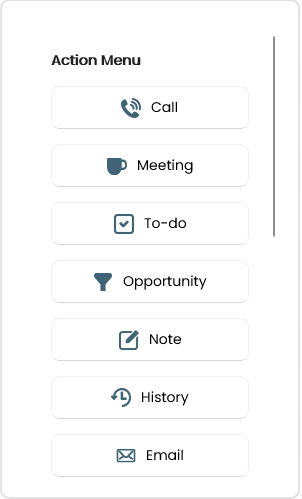
Available functions are:
- Call
- Meeting
- To-do
- Opportunity
- Note
- History
- Quote (using subscription service Link2Quotes, part of Linktivity)
- Form (using subscription service Link2Forms, part of Linktivity)
- Add to Favorites
- Add to Group
- Open
- Add to List (lists can be used for batch emailing in Mail Merge)
- Refresh from Act! (This will Sync Act! data for the record.)
- Delete
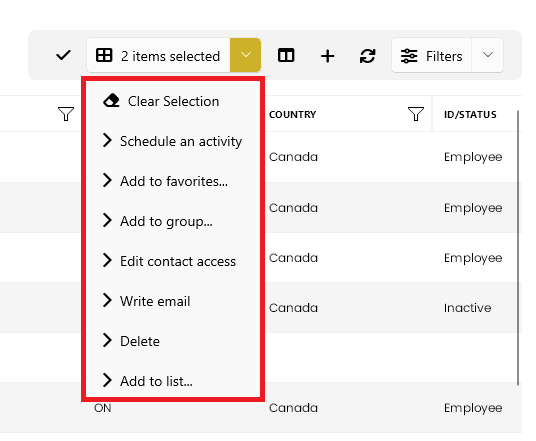
Checkmark in the top menu will allow you to access record selector.
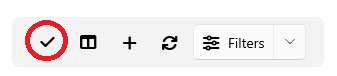
Once multiple records are selected, thee can be used to:
- Schedule an Activity
- Add to Favorites
- Add to Group
- Edit Contact Access (this will allow you to select public or private Contact Access)
- Write Email
- Delete
- Add to List
Detail View
Clicking a row with contact information will lead you to the Detail View. Tabs allowing you to access History, Tasks, Notes, and Opportunities are located at the top.

Toolbar at the top allows you to quickly create the most common types of tasks, add opportunities, and send emails. Linktivity subscribers will also be able to take advantage of Form and Quote buttons for Link2Forms and Link2Quotes.
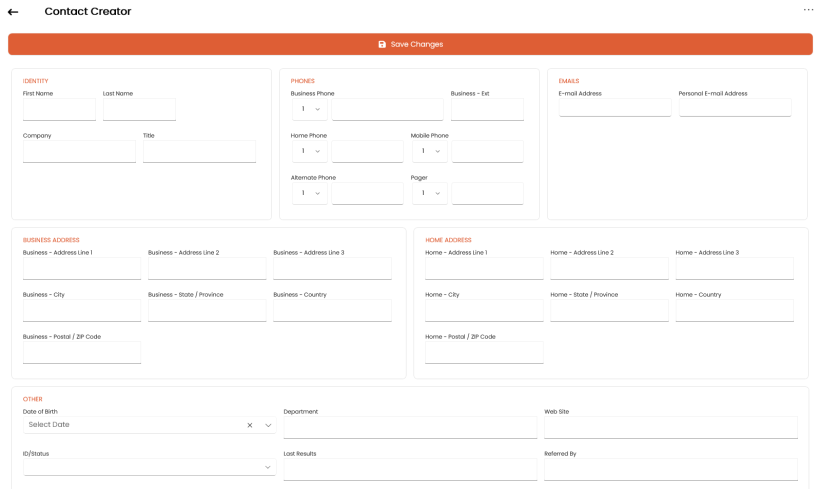
Editing Contact Data
Clicking EDIT button in the detail view will allow you to modify contact information. If you are connected to the Internet, modified and saved contact information will be saved to your Act! database immediately without requiring you to initiate a sync.

Contact information is presented in a default layout.
History, Tasks, Notes, and Opportunities Tabs in Contacts
History, Tasks, Notes, and Opportunities can be created and edited directly from each contact because each of these entities has their own tab in contacts.

If, in your Initial Wizard and Settings > Preferences you have opted for lighter, faster syncs without Notes and/or Histories, these will be downloaded for you when you click your contact's History or Notes tab. A progress bar at the bottom of the page will let you know where you are in the download.

Layout Editor
Selecting Edit Layout button will lead you to easy drag-and-drop field editor. Numerical dropdowns at the beginning of each box will allow you to adjust the width of your boxes. Customized layouts need to be saved under easily recognizable names. Use + Add Category from the top menu to insert gray divider sub-headers into your layout.
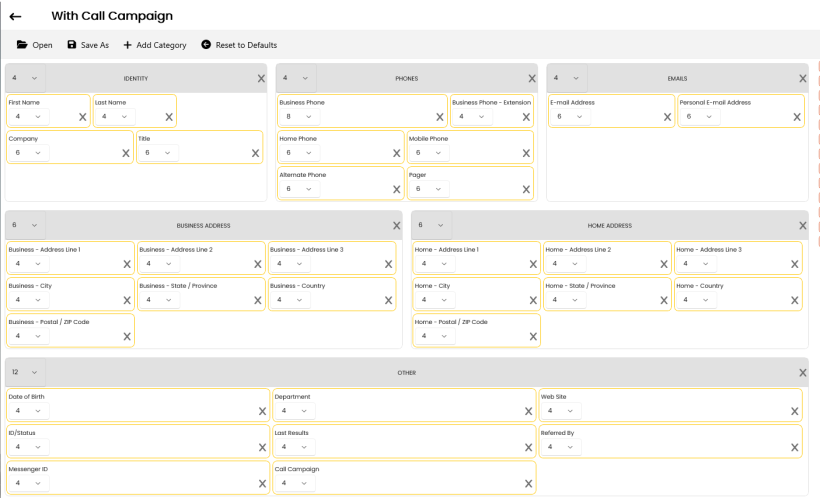
Use Manage Layouts in the top menu to access existing choices.
Emailing a Contact
If you would like to initiate emails from Keystroke Contact Manager, you must first input your email credentials into Settings > Preferences > Emailing. Once you included your email credentials, you can send a test email to ensure that the connection is working correctly.
To send emails to your contacts, simply click the orange-highlighted email address in the details view and type in your message and click 'Continue'. Your email will be recorded in the history tab for the contact (both in Keystroke Contact Manager and in your Act! database)
To create email templates, and to send out batch emails using values from contacts' and your records, please review the section on Mail Merge.
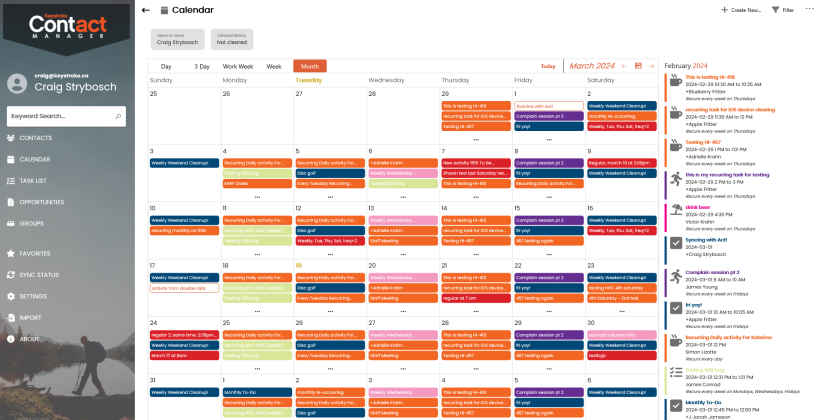
Calendar
Available views for the Calendar are Day, 3-day, Work Week, Weekly, and Monthly. Colors used by different task types can be modified in SETTINGS > TASK TYPES.
Creating a New Recurring Task in Calendar
Using '+' icon allows you to create new tasks. While one-time tasks will save directly into Act! and appear in your Task List and Calendar, recurring tasks will require a quick sync. This can be done by clicking the orange button which appears in the bottom left corner of the page after a recurring task is created.

Another option is to select Latest Updates Only from the Sync Dropdown from the top right corner.

Task List
List View
Sorting, and filtering in the List view operate similarly to the list view in Contacts, and the tools are accessed by clicking funnel icons next to the column names.
The Sequence of columns can be adjusted by dragging and dropping column headers. Selection of the Columns can be adjusted using column picker in the top right menu.
Creating a New Recurring Task
Using '+' icon allows you to create new tasks. While one-time tasks will save directly into Act! and appear in your Task List and Calendar, recurring tasks will require a quick sync. This can be done by clicking the orange button which appears at the bottom of the page after a recurring task is created.

Another option is to select Latest Updates Only from the Sync Dropdown from the top right corner.
Common Filters in Tasks
Some popular filtering options can be accessed from the top menu.
Footer with a Counter of Tasks
The footer with the counter at the bottom of the list view will adjust to either your entire set or to filters you will select.

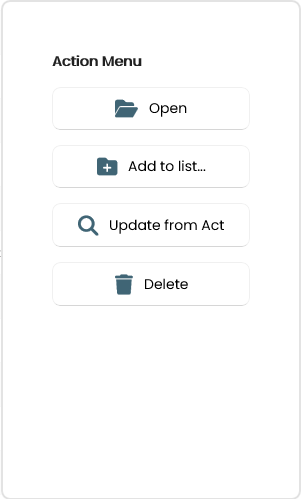
Action Menu in the List View
In the beginning of each row, three dots will allow you to surface action menu for the task.
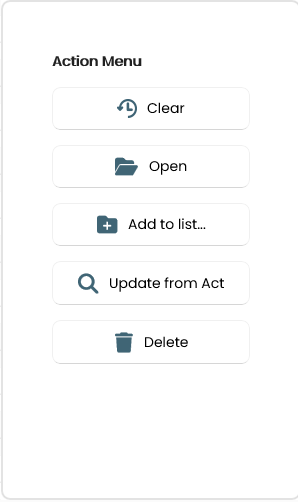
Available functions are:
- Clear
- Open
- Add to list...
- Update from Act! (This will Sync Act! data for the record.)
- Delete
Task List Multi-select
Checkmark in the top menu will allow you to access record selector.
Once Multiple records are selected, you can act on them by clicking Action button.
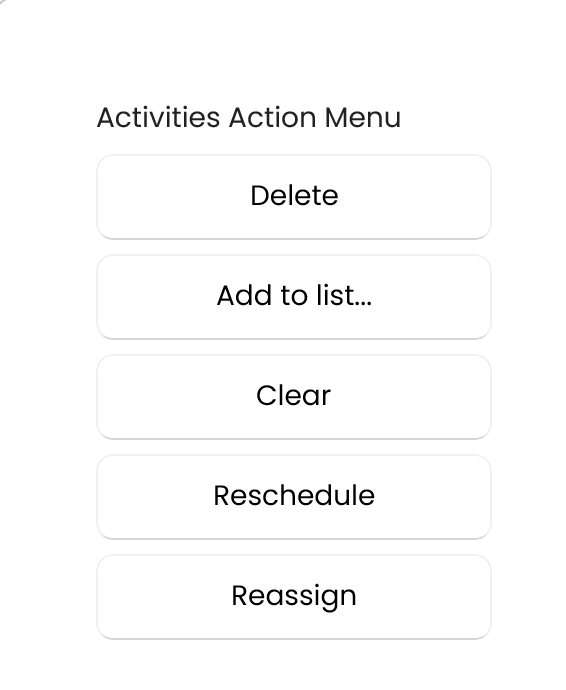
Actions available are:
- Delete
- Add to list
- Clear
- Reschedule
- Reassign
Task Detail View
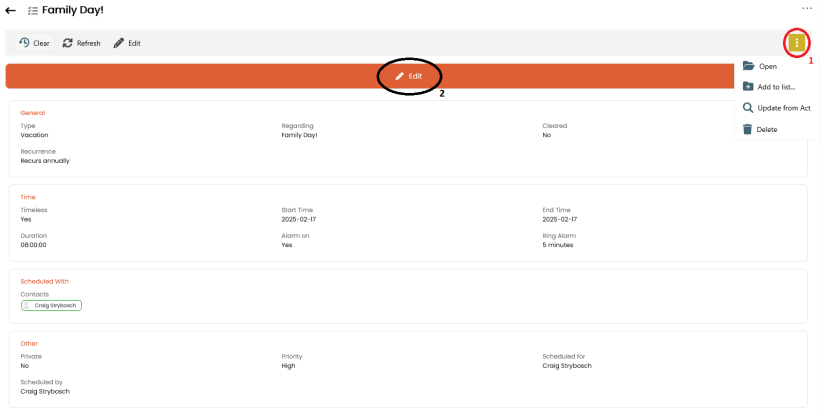
Tasks in detail view is standardized and does not offer a layout editor. Tools available are:
- 3-dot Action Menu for the record.
- Edit button which allows to open a screen to modify task information. If you are connected to the Internet, modified and saved task information will be saved to your Act! database immediately without requiring you to initiate a sync.
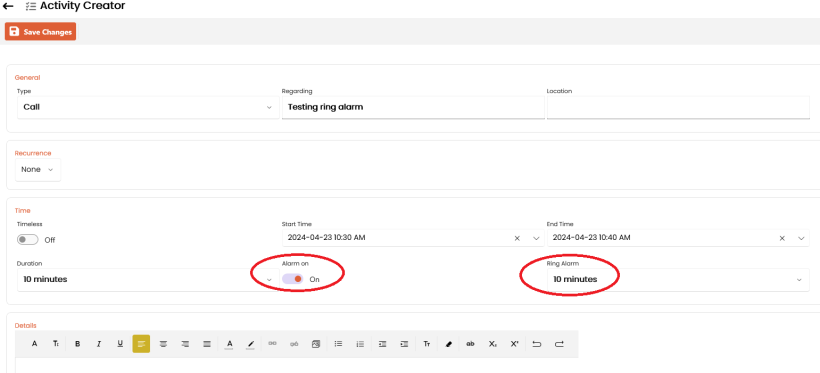
Task Alarms
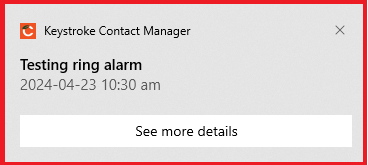
If you would like to be alerted to your upcoming tasks, ensure that your alarm setting is on when you are creating your task, and specify when you would like to be notified. The default time is obtained from Settings > Preferences.
At the required time you will receive ring alarm, and a notification will appear in the bottom right corner of your app. Clicking See More Details in the notification message will let you open the task detail view.
Opportunities
Opportunity List View
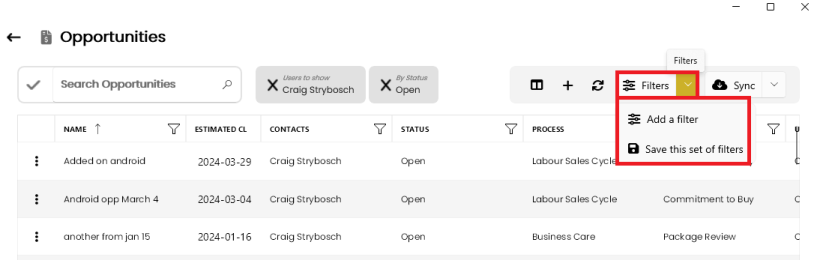
Similarly to Contacts, and Tasks, List View for Opportunities offers sorting and complex filtering. The functionality is accessed through funnel icons.

The Sequence of columns can be adjusted by dragging and dropping column headers. Selection of the Columns can be adjusted using column picker in the top right menu.
Common Filters in Opportunities
Some popular common filtering options can be accessed from the top menu.
Aggregates
Opportunity list provides you with a counter footer showing the number of opportunities. The grid also displays sum of all opportunities displayed, and their average value.

Action Menu in Opportunities
3-dot icons allow you to surface opportunity action menu.
Checkmark in the top menu will allow you to access record selector.
Opportunity Creator
Clicking '+' icon in the top menu will lead you to new-opportunity creator.
Opportunity Detail View
Opportunity Detail View is accessed by clicking Opportunities in the list view. It is divided between the Opportunity Details and Products tabs. You will be able to reuse the Products set up in your Act! database to calculate opportunity totals. The tools available are in line with the tools in the other areas of Keystroke Contact Manager.

- Edit button which allows to open a screen to modify Opportunity information. If you are connected to the Internet, modified and saved Opportunity information will be saved to your Act! database immediately without requiring you to initiate a sync.
- Layout editor which helps you to customize your layout.
- Opportunity detail tab
- Products tab
- 3-dot Action Menu for the record.
Groups
Groups area gives you the ability to view and edit groups, including making changes in your sync group selection.
Favorites
Left-side navigation also allows you to access a narrower list of your frequent contacts.
From Contact List View, you can add a contact to your favorites by clicking the ellipsis at the front of the row and then selecting Add to Favorites.
In the detail view, you can simply click the star in front of your contact's name.

Highlighted star means contact has been added to the select list.

Import
KCM offers import of .xlsx, .csv, and structured .txt files. If you have an .xls file, you will need to convert it in Excel to .xlsx. Though you will most frequently import data into Contacts table, importing into Company, Group, Opportunity, or Products tables is available as well. Import tool can be used not just to import new entities but also to update existing ones. If, for example, you decided to collect more information about your contacts, you can update your contacts in KCM and Act! from a spreadsheet.
Please note that KCM importer for Contacts does not parse names. You will need to have a column for First Name and a column for Last Name and match and map them to FirstName field and LastName field of KCM/Act!.
If you would like to import a file to KCM, you need to select Import from the Left navigation and then click + icon in the top right corner. You will be able to browse to the location of your file, select, and open it.
Create an Import Profile
Merge Type
Here is where you will decide if you are importing into Contacts, Company, Group, Opportunities, or Products tables.
First row contains column names
Ideally, the first row of your file should contain the column names to make it easier to match and map the imported data to Act! fields. If this is the case, please mark First row contains column names as On. If your data in the first row is easy to identify, you can import it without naming each column.
If a match is found
You can either Add Entity, Skip Entity, or Update Entity based on the data in your Import file. You will define what constitutes a match in the next screen. The mapping for updating entities will be defined in the screen which will follow after.
If a match is NOT found
Similarly you need to decide what happens if a matching Contact, Opportunity, Company, Group, or Product does not exists in your database. You can either Add Entity, or Skip Entity based on the data in your Import file.
If multiple matches are found
In addition to adding entity or skipping entity, in the case of multiple matches you also have the option of selecting entity, and updating all entities
Match Criteria
Email address is often used as an easy way identifying matching records in Contacts. If you do not have email addresses available in your import file, a combination of multiple fields is recommended (eg FirstName, LastName, & City)
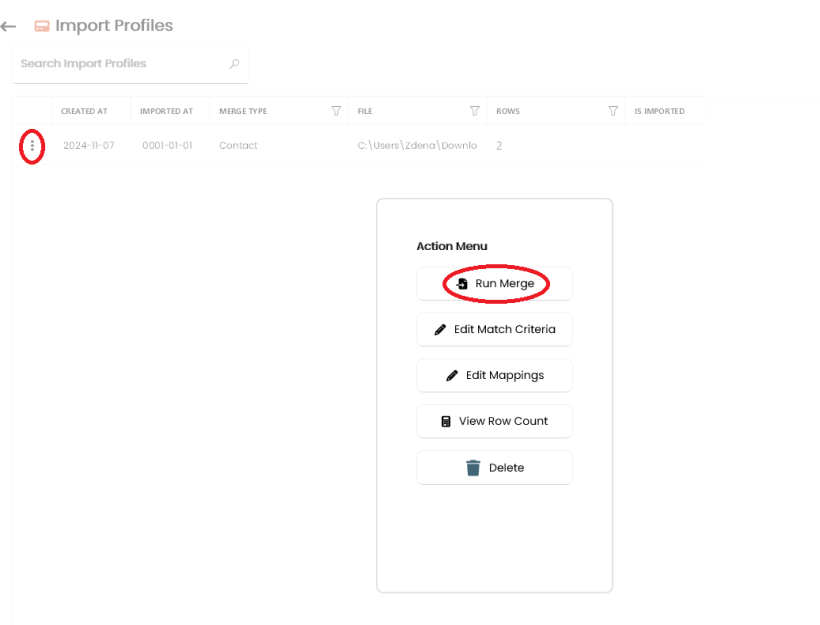
In the File Source Column you will select the names of columns from the first row, if the first row contained headings. If, earlier in the import process, you selected OFF for 'First row contains column names', you will need to match the values in the first row of your file to the names of KCM/Act! fields. In many cases (FirstName, LastName) you will want your operator to be 'Equal To' but you have a number of other operators to select from. Before 'Merging' your imported data into KCM/Act!, you will be able to review it again by going to the elipsis icon in front of each Import Profile and selecting Edit Match Criteria.
Run Merge
You will be able to integrate imported data into your KCM/Act! database by clicking ellipsis icon in front of the import profile, and selecting Run Merge.
Your imported data will sync into Act! automatically.
Mail Merge
Keystroke Contact Manager allows you to send batch emails to your contacts using values from their contact records and values from 'My Record'. To use this feature, you must input your email credentials into Settings > Preferences > Emailing.
Once you included your email credentials, you can send a test email to ensure that the connection is working correctly.
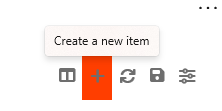
To send out batch emails, you must first create email templates by going to Mail Merge in the left navigation, clicking '+' in the top right corner to 'Create a new item. It is a standard toolbar but 3 less common element should be noted.

- Reference line of your batch email
- Insert Merge Mail Variable button allows you to first pick between your own values or your contact's values, and then decide which fields you wish to have reproduced (such as FirstName, or Company)
- If you copied formatted text from and existing document, and you are not sure you want to use this formatting, you can highlight the text, and click Clear Formatting button, start formatting using the toolbar.
When the template includes all information and formatting you need, you need to save the template, and send out your batch either using three0dot action menu in the list view or Send Emails button in the detail view. You can decide who the recipients will be by clicking 'Add Recipient' button to include contacts individually, or by clicking Add List button which will use a list created in Contacts. If you apply an existing list, you will be able to add or remove individual recipients before pressing Start button.
Settings
Act! Connection
This setting allows you to change the Act! connection settings should you wish to use a different database or if your Act! credentials changed. Logout option will wipe out all data held in Keystroke Contact Manager, and must be used with caution. The setup process allows you to send a test email to ensure that the connection is working correctly.
Once connected, you can create email templates by going to Mail Merge in the left navigation, and clicking '+' in the top right corner to Create a new item. Formatting of a new template is very intuitive but we should highlight 3 less common elements.
Sync Groups
In this setting you can change Act! group which is being used to Sync your data. To apply the setting, you must re-sync your data. The first sync after group selection change will a Download All Data sync.
Contact Field Mappings Setting
This setting determines with Act! Contact fields will be available in Keystroke Contact Manager.
Opportunity Field Mappings
This setting determines with Act! Opportunity fields will be available in Keystroke Contact Manager.
Preferences
General preferences can be accessed by going to SETTINGS > PREFERENCES. They include:
Grids
- Maximum Items per Page
- Heading Font
- Font
Editors
Allows you to select whether the editor closes after saving a record, and whether an updated version of a record should be downloading before you edit. This setting should be decided based on how many people are likely to work with the same Act! record.
Contacts
- Additional Field
- Use device favourites
Tasks
- Days from Past to Sync
- Days in Future to sync
- Default 'Schedule with' contact
- Default Type
- Default Priority
- Default Ring Alarm
- Default Duration
- Default Timeless
Calendar
The setting gives you the choice of switching to 24-hour view, if it is frequently used in your industry.
Opportunities
- Download Opportunities On/Off
- Download Only Open Opportunities On/Off
- Default 'Schedule with' contact (eg My record)
Histories
- Download Histories On/Off For larger databases it is recommended not to download Histories as apart of bulk sync, as this will add to the time required to sync significantly. History for your contact will be downloaded selectively should you browse to the History tab for your contact.
Notes
- Download Notes On/Off For larger databases it is recommended not to download Notes as apart of bulk sync, as this will add to the time required to sync significantly. Notes for your contact will be downloaded selectively should you browse to the Notes tab for your contact.
Sync
- Threads to use during sync
- Items per page during sync (Default is 500)
Emailing
You can enter your credentials for Office 365, Gmail or Custom email account to allow you to send emails from Keystroke Contact Manager and ensure they get recorded in the Contact's history.
File Storage
You can select the type of file storage you would like to use for your images and Merge Mail templates. While File System means your own PC and does not require additional setup, selecting OneDrive or Google Drive will require you to enter your credentials for one of these services.
QSales
If you are using QSales with your Act! database to integrate with Quick Books, ensure that this setting is on. While you won't be able to sync transactional data, you will be able to download summary QSales fields such as Past Due Balance or Last Payment Date.
Task Types
This setting will allow you to select colors for different task types. This will make it easier for you to understand your calendar at a glance.
Advanced
- Send e-mails using launcher on/off
- Open items in new window on/off