dataBoss Manual
Welcome

dataBoss - Import, Export & Migration tool for Act!
Databoss is the one tool you need for professionally exporting, importing, and migrating data from Act! CRM.
Exporting Features:
- Exports each table to a separate CSV file
- Includes display names rather than column names
- All fields exported, including linking ID fields (ContactID, CompanyID, Etc.)
- Includes Activity, History, and Note linking tables.
- Easy to use
Importing:
- Import from CSV, Excel, and Act! Databases.
- Import into Contacts, Companies, Opps, Secondary Contacts, Groups, Picklists, and more.
- Creates new fields from source
- Specify fields for linking to a record on import
- Set limited access to Record Manager
- Apply Proper case to text
- Strip RTF, HTML, or XML from Notes and Histories on import
- Choice to Replace, update blank, update existing, append, or insert field data on import
Migration:
Sometimes the easiest way to repair or clean a database is to export the data as CSV's (described above), and the import that data into a clean new database. You'll end up with a fresh database with all the data from the old database with none of the mess. A perfect tool for database repair or refreshing, and dataBoss does it all.
System Requirements
- Computer with a Pentium IV or better processor.
- Microsoft Windows 10, 11 (32bit and 64bit versions)
- Act! v18+
Installing
Before the installation of dataBoss, it is recommended you close all open applications, including Act!.
dataBoss requires a minimum Act! version of 18 and supports 32 and 64 bit versions of Act!.
dataBoss requires that all system requirements for Act! be met on the system.
These requirements are determined by your version of Act!.
Please refer to the Act! System Requirements documentation for the version you are using to verify compatibility.
To install, simply run the dataBoss4Act_Installer.exe, select your target folder and install.
Act! Databases Setup
Main Setup
Below is the main screen for setting up dataBoss.
To do a simple export and import:
- Specify your export location in the File Locations box to store the exported CSV files.
- Select your Act source database, specify Username and Password (if needed).
- Select your Act destination database, specify Username and Password (if needed).
- Click the Save Setup button.
- Once you've specified the above information and saved your setup, click the Export Act! Data button.
- After the files have been exported, you may then import those files into your new database. Click the Import All Act Data button.
- You will then see a series of screens. See the Import Process section.
- This process will take some time, depending on the size of your database, computer and hard drive speeds, etc.
Note: Under some circumstances, such as a corrupt database, you may need to use the Advanced Import section rather then the automated import. Please see the Advanced Import section.
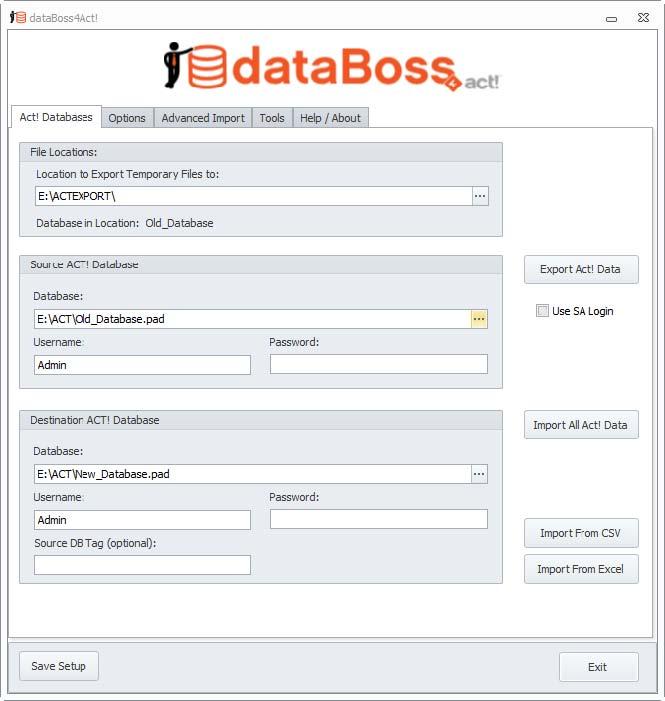
File Locations
Specify the location to store your exported CSV files to.
Click the ellipses button to select the folder. If this is a new setup, the Database in Location will show: None.

Once you've exported a database, the label will show the name of the database that was exported. This is done to avoid confusion if you're exporting different databases.

Save your setup by clicking the Save Setup button at the bottom of the main dataBoss screen.

Source Act Database
Specify the source database by browsing for the Act pad file. Then enter your username and password if required.

Once you have specified an export file location and the above database information, you can then click the Export Act! Data button, shown above. If you wish to use the files for another application and do not want to import them into another Act database, you will not need to proceed any further.
Save your setup by clicking the Save Setup button at the bottom of the main dataBoss screen.

Destination Act Database
Specify the destination database by browsing for the Act pad file. Then enter your username and password if required.

Once you have specified an export file location and exported your data from the Source Act Database section, you can proceed to import your data automatically. Click the Import Import All Act! Data button, shown above.
Note: Under some circumstances, such as a corrupt database, you may need to use the Advanced Import section rather then the automated import. Please see the Advanced Import section.
Save your setup by clicking the Save Setup button at the bottom of the main dataBoss screen.

You may also do a simple import from a CSV or Excel file into the contact table by clicking the Import From CSV or Import From Excel buttons as shown above.
Import Process
Importing into Act!
When you start the Import process, you will see a series of screens. If you're doing an Import All, you will see all entity (Contact, Company, Group, Opportunity and Product) mapping screens. If you're doing an Advanced Import, you will only see the mapping screen when importing the main entity.
Below is the Contact Field Mapping screen. All mapping screens are identical. Fields are automatically mapped when a mate is found. If you have custom fields, these will most likely be blank.
To add a missing field, click the row of the field you need to create, then click the Create New Field button. Once a row has been selected, the Create New Field button will be active. To automatically create any non-mapped fields, click the Create Remaining Fields button. On rare occasion, a field may not be created properly and may need to be manually created in Act. If you want your newly created fields to a have a prefix, such as NEWFIELD_, specify that in the New Field Prefix box. This can help distinguish existing fields from newly created ones.
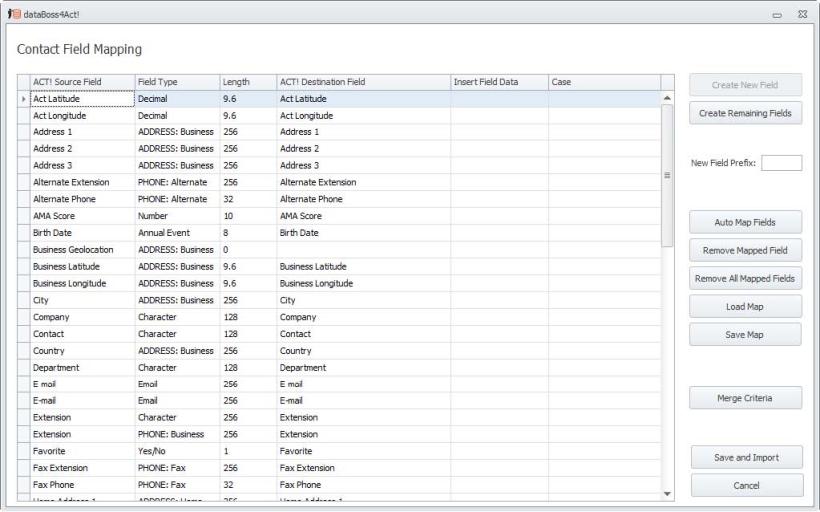
Automatic mapping is done when the screen loads, however you can force it again by clicking the Auto Map Fields. This is useful if you had removed a single or multiple mapped fields using the Remove Mapped Field or Remove All Mapped Fields buttons. To save your current mapping, click the Save Map button. You can also load a pre-existing map by clicking the Load Map button.
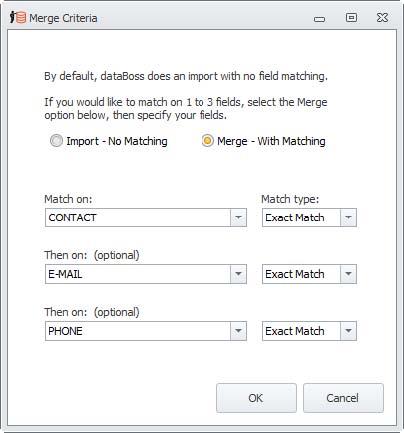
If you would like merge records based on matching fields, click the Merge Criteria button. In the below example, it's matching on the CONTACT, E-MAIL and PHONE fields. Be sure to click the Merge -With Matching option.
To save your map and begin importing, click the Save and Import button. If you're doing an automated import, you'll see the remaining entity mapping screens before the import starts.
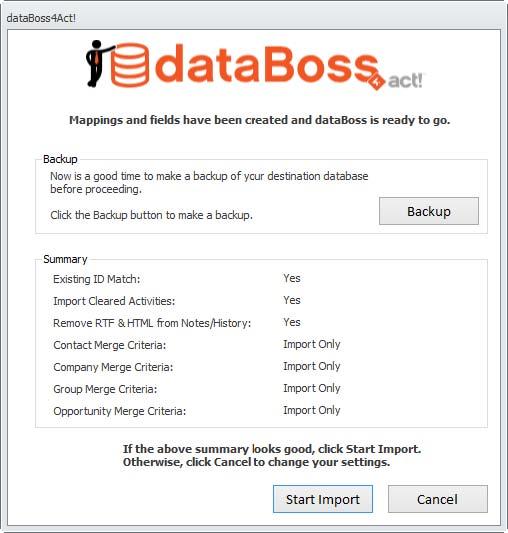
Once all required mapping screens have been saved, you'll see the final summary screen. It is strongly recommended to make a backup of your destination database before proceeding. Do this by clicking the Backup button.
Click the Start Import button to begin the import process. You'll see a series of progress dialogs indicating which step in the process is occurring.
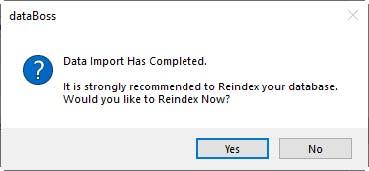
When the import process has completed, see the below screen. It is highly recommended to Reindex your database by clicking the Yes button. This will ensure optimum speed for your newly imported database.
Options
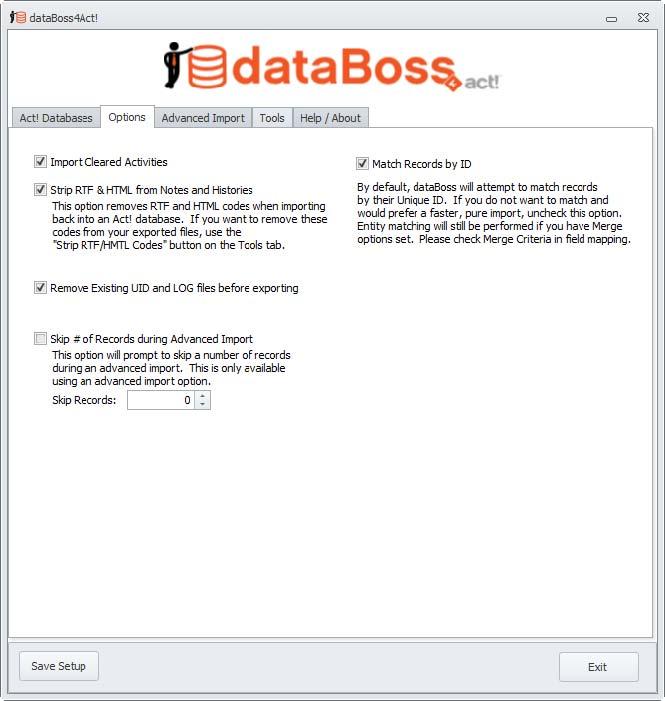
Options for Export and Import
There are several options for both exporting and importing your data.
Import Cleared Activities:
This will import any old cleared activities you have. It's checked by default, so if you don't want old, cleared activities, uncheck this box.
Strip RTF & HTML from Notes and Histories:
This option removes RTF and HTML codes when importing back into an Act! database. Depending on your version of Act, note text and history details are embedded with Richtext (RTF) or HyperText Markup Language (HTML). This allows Act to store data such as font, font size, colors, images, etc. Checking this option will remove ALL of that formatting during import. This can, depending on the size and quantity of your notes and histories, dramatically reduce the size of your database.
If you want to remove these codes from your exported files, use the Strip RTF/HMTL Codes button on the Tools tab. This is helpful if you're using the exported files for other applications.
Remove Existing UID and LOG files before exporting:
Click this option if you're re-doing an import using the same Export folder. Otherwise, data may become mismatched.
Skip # of Records during Advanced Import:
This option will prompt to skip a number of records during an advanced import. This is only available using an advanced import option.
Match Records by ID:
By default, dataBoss will attempt to match records by their Unique ID. If you do not want to match and would prefer a faster, pure import, uncheck this option. Entity matching will still be performed if you have Merge options set. Please check Merge Criteria in field mapping.
Advanced Import
Advanced Importing
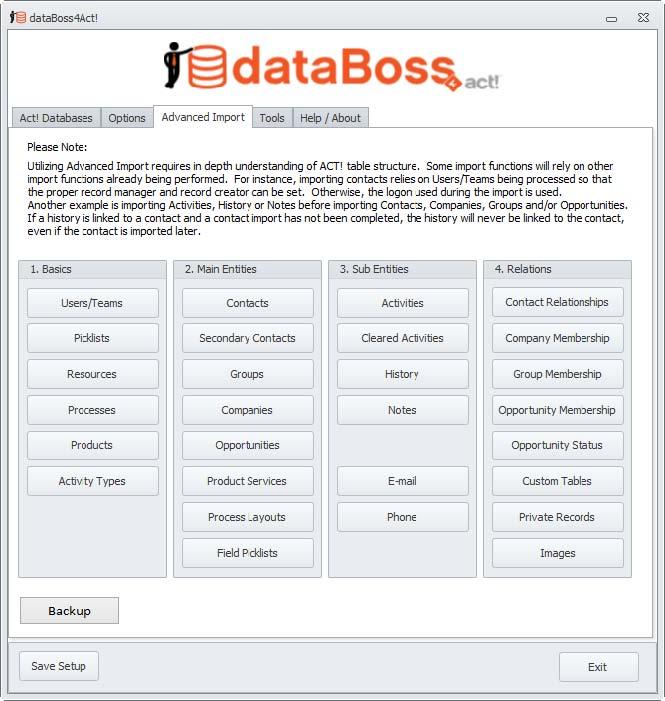
Utilizing Advanced Import requires in depth understanding of the Act! table structure. Some import functions will rely on other import functions already being performed. For instance, importing contacts relies on Users/Teams being processed so that the proper record manager and record creator can be set. Otherwise, the logon used during the import is used.
Another example is importing Activities, History or Notes before importing Contacts, Companies, Groups and/or Opportunities. If a history is linked to a contact and a contact import has not been completed, the history will never be linked to the contact, even if the contact is imported later.
Recommended Process:
- Import all items in the Basics section, starting from top to bottom.
- After Activity Types has finished, make a backup using the Backup button. You should use a name that indicates it is step 1.
- Begin the Main Entities section, top to bottom.
- Make another Backup. Give it a new name, preferably indicating it is step 2.
- Begin the Sub Entities section, top to bottom.
- Make another Backup. Give it a new name, preferably indicating it is step 3.
- Begin the Relations section, top to bottom.
- Make one final Backup. Give it a new name, preferably indicating it is step 4.
Making backups along the way will allow you to revert back to a previous stage should something fail during import. This can happen when you're attempting a database import. Or if you make a mistake along the way, it's faster to start at the previous section then at the beginning.
Using Advanced Import, you can also pick and choose what you import. Just be aware that some items rely on other processes having been completed before. For example, you only want your Contacts, nothing else. You still should run through the Basics section, although it's not required. Things like history or notes will fail though if their linked main entity does not exist.
Tools
dataBoss Tools
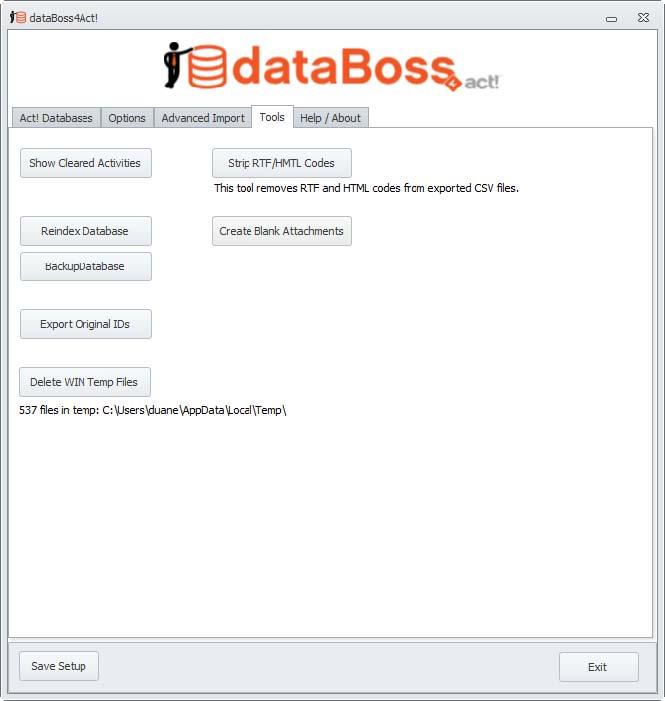
dataBoss offers a few tools that may help in your exporting and importing.
Show Cleared Activities:
This will show you all of the cleared activities in your database. This is currently just a view and not data manipulation exists.
Reindex Database:
Clicking this button will Reindex the selected database. This will ensure optimum speed for your database.
Backup Database:
Clicking this button will make a backup of the selected database.
Export Original IDs:
This creates a 2 column CSV file, exporting the CONTACTID and ORIGINALID (automatically created during import) for your reference. This is currently only for the Contacts table.
Delete WIN Temp Files:
Clicking this button will attempt to remove all leftover, currently unused temporary files in Windows. Having excess temp files can, at times, cause undesired issues with Windows, Act and other applications.
Strip RTF/HMTL Codes:
This tool removes RTF and HTML codes from exported CSV files. Depending on your version of Act, note text and history details are embedded with Richtext (RTF) or HyperText Markup Language (HTML). This allows Act to store data such as font, font size, colors, images, etc. Using this button will remove ALL of that formatting for the field you choose from the selected CSV file. This is useful if you're using the exported file in another application. The 2 common files to strip codes from are:
- HISTORY.csv and select the DETAILS field
- NOTE.csv and select the NOTETEXT field.
Create Blank Attachments:
This is useful if you don't have the files from the attachment folder during import. If during import your files are not available, the attachment link will not be created. Using this tool recreates the necessary Act data and allows you to see and use them in Act once they have been copied to the Attachments folder.
Help and About dataBoss
Help and About dataBoss
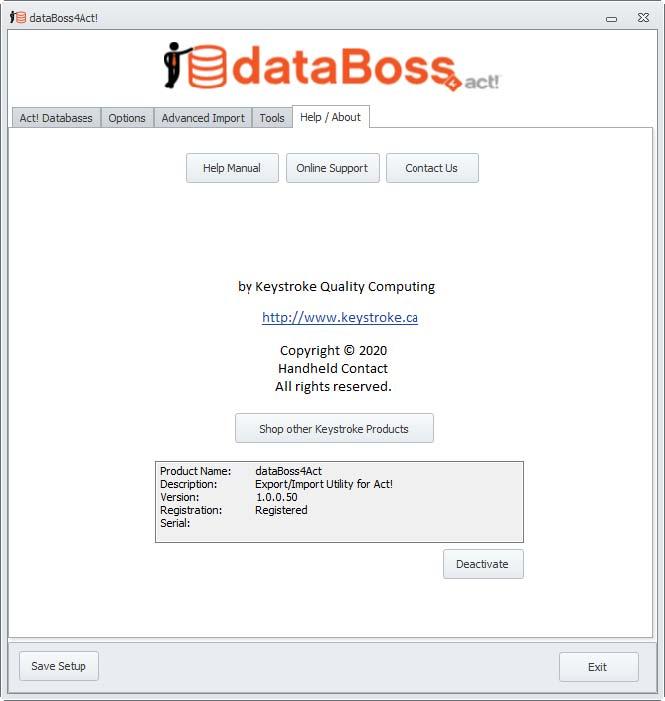
Help Manual button: Displays this document.
Online Support button: View available paid options for getting support for dataBoss, any other Keystroke product or Act!.
Contact Us button: Contact form at Keystroke website.
Shop other Keystroke Products button: View all of the products Keystroke offers to help your business grow and run efficiently.
Deactivate button: If you are registered and activated and need to move dataBoss to a different machine, click the Deactivate button to remove the license from your current machine. You can then install on a new machine and register with your serial number.
