Act4Mail Manual
Act4Mail is an integration addon for Act! Cloud users for both 32 & 64-bit versions of desktop MS Office Outlook 2013 or higher.
- Act4Mail Manual
- Act4Outlook Installation
- Act4Outlook Configuration
- User-initiated syncs
- Sending Individual Records to Act!
- Templates and Mail Merging
Act4Mail Features
SUPERFAST HISTORY RECORDING
Send an email from Outlook, and it will be automatically attached to the matching record in Act! within a second. Act4outlook supports this feature even with Act! closed, and Act4mail doesn't even require Act! to be installed.
COPY CONTACTS TO ACT!
Send Outlook contacts to Act! by simply right-clicking one or more contacts from your address book, and select "Send to Act!". Perfect when contacts are added to Outlook from sources like business card scanners or vcards.
COPY TASKS TO ACT!
Send one or more tasks to Act! from your Outlook To-Do list that you create from either Outlook or your mobile device. IOS users can type countless reminders into their mobile devices, and then send them all to Act! with a couple of clicks of their mouse.
Mail Merging
Act4mail now includes MailMerge4act for robust mail merge functionality to both print & Email. Our powerful design tools and deliverability features allow you to create beautiful templates, and then merge them into personalized emails that bypass Outlook for greater reliability & speed.
INCOMING EMAIL HISTORY RECORDING
Act4Outlook can automatically record and link all incoming messages to the Act database as long as a Contact with the sender's email address is found in the database. Users can also enter one or more domain names to ignore so that any emails sent from those domains are not attached to the database.
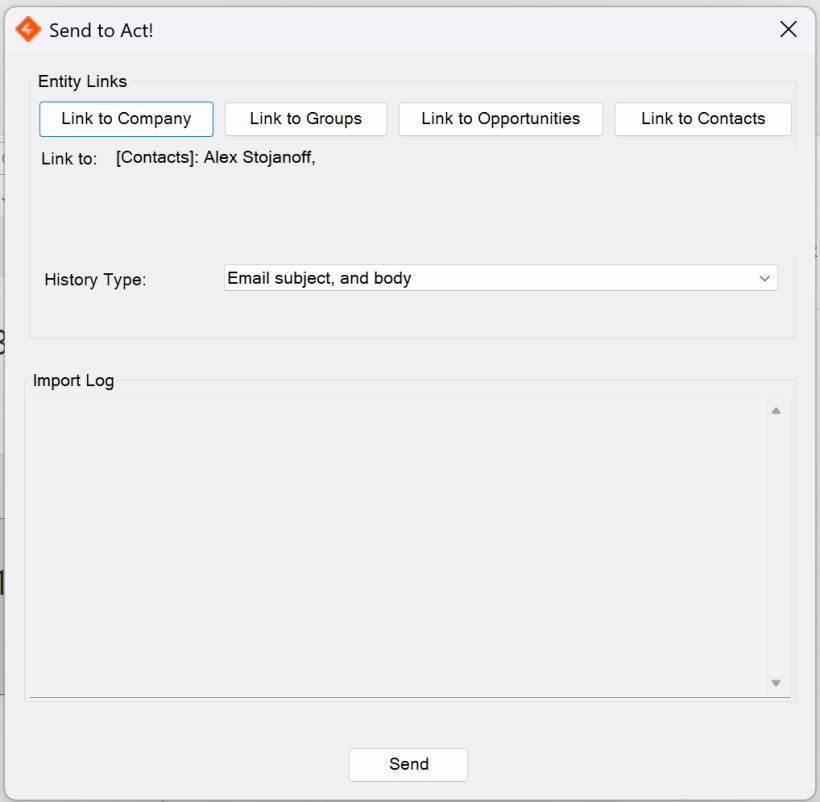
LINK TO ACT!
Link your email to additional Contacts, Companies, Groups, or Opportunities on the fly, so the History can be attached to more than just the email recipient.
COPY ACTIVITIES TO & FROM ACT!
Keep your Act! & Outlook calendars aligned! Send one or more activities to Act! from your Outlook calendar, or conversely, send activities in Act! to Outlook. Perfect for those invites that never make it to Act!, or appointments you create in one calendar, but not the other. Handy when using Siri, Alexa, or Google Assistant to create appointments, that can easily be transferred to Act!.
REDUCE CALENDAR DUPES
Act4Outlook reduces duplication by keeping track of previously imported activities. If an activity is updated in Outlook with new data, simply re-send the activity to Act which will update the previously imported Act activity.
COMPARISON BETWEEN ACT4OUTLOOK AND ACT4MAIL
Please check out the Keystroke product page to review comparison between Act4Outlook and Act4Mail
Act4Outlook Installation
What you need
- Act! Premium Cloud subscribers will be able to click on Web API hyperlink applicable to their geographic region but if your Act database is hosted with another Act! Hosting provider, you will need to have API URL. If you do not know what it is, please contact your hosting provider prior to installation. If your main Act! database is hosted locally, your Act! Administrator can provide this address. The Act Web API URL is usually in the format https://yourserverhostname.com/act.web.api
Note that HTTPS is required for Act! Web API to function. Also, if you are self-hosted, please note that the latest Act! Web API (version 1.1.595.0 or higher) must be installed on a server which has direct access to the Act! database before you attempt to use Act4Mail on your local desktop. You can download the latest API from Act website at www.act.com/downloads.
- The User that will be accessing Act4Mail must also be given the Web API Access permission in Act! Please click Tools > Manage Users in Act, and verify that this permission has been granted to the user otherwise they will not be able to log in to the database.
- Your Outlook needs to be 2013 or higher. This includes 32 and 64-bit versions of MS Outlook.
Installation
- Please download installer file named Act4MailInstaller.exe from https://www.act4work.com/files/Act4Mail/ to your desktop or download directory. The location has to be easily accessible to you.
- Close any open instances of Outlook.
- If installing on a standalone desktop PC or server, simply double-click on the Act4Mail setup file to initiate the installation process. If you are installing Act4Mail on a RDS/Terminal server, please set the server in install mode prior to running the setup file. More info can be found here.
- Once installed, the Act4WorkUpdater will be launched automatically. It is highly recommended to install any available updates.
Act4Outlook Configuration
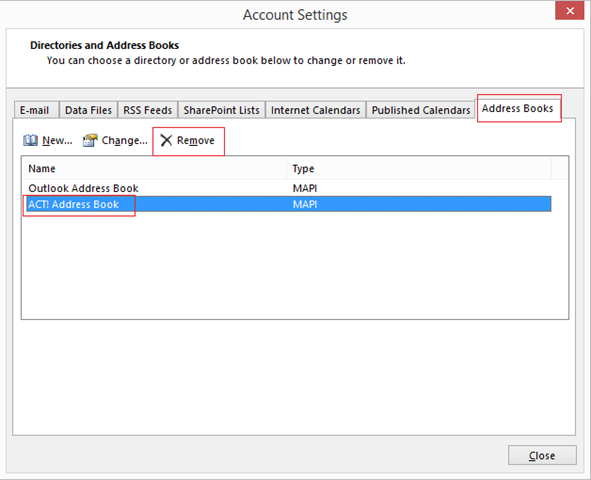
- After completing the installation, launch Outlook. Once it is loaded, click on File from the top pull down menu, and then Act! Database Settings.

- Click on the Address Books tab on the furthest tab to the right, and you should see Outlook Address Book, and Act! Address Book. Select the Act! Address Book and then click on Remove just above it. Once removed, click on Close, and then restart Outlook. If the Act! Address Book is not visible in the list, please proceed with the steps below.
Note: Starting from Act version 20 and higher, it may also be necessary to disable the native Act! integration addin in Outlook to prevent duplicate histories from being recorded. To do this, click File > Options > Addins, and click the Go button at the bottom. In the list, find and uncheck the Act.Office.Outlook.Addin and click OK.
- Once Outlook has restarted, you should be safe begin the configuration of your Act4outlook. It's important to note all the configuration settings for Act4outlook can be found in Outlook, not Act!.
Act4Mail Settings
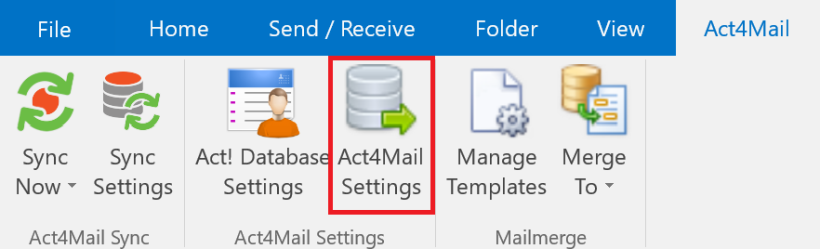
- Within Outlook in the top navigation click Act4Mail, and then select Act4Mail Settings.
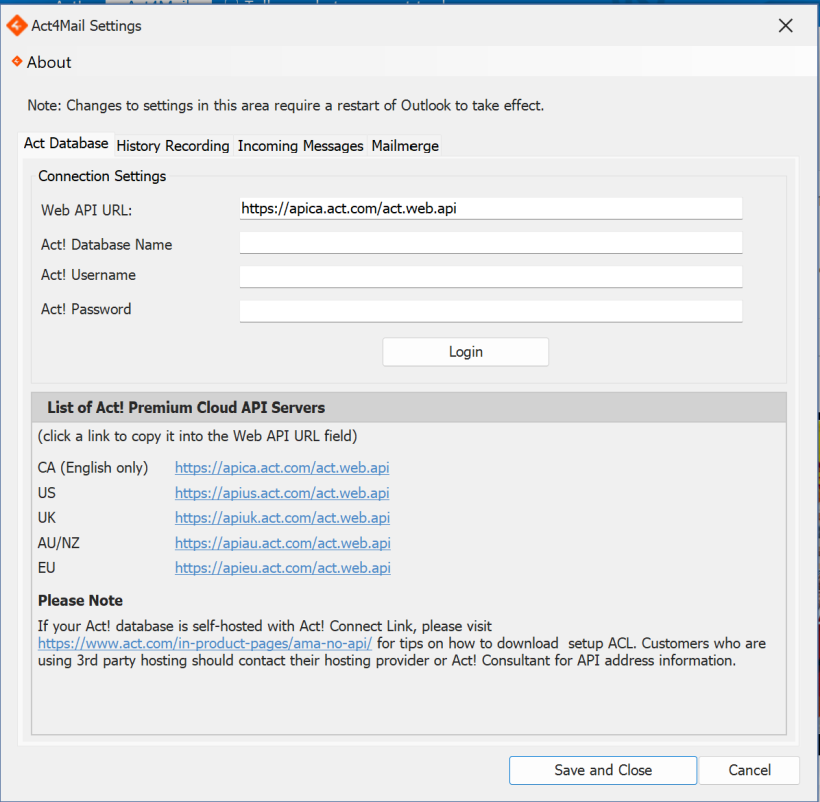
Please note that whenever you change the settings, you need to close and restart Outlook for the settings to take effect.
Act! Database tab
- Enter your Act For Web and Act4Outlook connection details which includes the API URL, database name, Act! User name, and Act! Password. If you are an Act! Premium Cloud subscriber, you can click API URL for your geographic region and it will be entered in for you.
Please be careful not to include additional spaces. (Even if processed at login, they could cause issues later.) Click Login to verify that these settings are correct.
Please note that whenever you change the settings, you need to close and restart Outlook for the settings to take effect.
History Recording Tab
- In the History recording tab you will select if and how your sent messages will be recorded in your Act! database. This allows you to control if you would like the body of email recorded into your Act! database, and decide about your email attachments. This is an important customization because it depends on your priorities. Attachments quickly add to the size of your Act! but may be necessary based on the work you do. You can also make the history private to the user who sent the email. If you select recording message not sent from your usual desktop, your Outlook will look at sent folder for emails sent from other devices and record them as well. Excluded email accounts setting is useful if you have multiple email accounts and you don't wish to have some of them included in history recording to Act!
Please note that whenever you change the settings, you need to close and restart Outlook for the settings to take effect.
Incoming Messages
- Inbound messages can be recorded to your Act! database as well, if you select these preferences in the Incoming Messages tab. This may not be necessary if you generally reply to most of your messages because the incoming message will be recorded as a part of the reply. If you do not reply to most of your messages, though, it can be useful to record your incoming messages into Act! You can exclude emails from specific domains (such as vendors who email you frequently).
Please note that whenever you change the settings, you need to close and restart Outlook for the settings to take effect.
MailMerge Tab
- MailMerge tab handles settings important two mail-merging:
- default template folder specifies the location of the templates. Single Act! database users will typically store their templates on their desktop computer but in multiuser environment you can set up this folder on a server and have all users share company templates.
- Contact Exclusions selects the field holding e-marketing permissions/un-subscriptions from your customers, as well as the value which indicated that the customer does not wish to receive emails. If you do not have this field in place, Act4Mail will allow you to create it.

Please note that whenever you change the settings, you need to close and restart Outlook for the settings to take effect.
Act! Database Settings
Within Outlook in the top navigation look for click Act4Mail, and then select Act! Database Settings.
Contact Field Mapping
Contact Field Mapping allows you to map Outlook Fields to Act! fields and decide how to handle duplicates. The default field used to determine if a record is a duplicate is the email address field but you can make a change in the 3rd column by selecting another field, or combination of fields.
Activity Settings
In activity settings you are able to select default activity type and to set a preference to have a Create Activity window appear whenever you schedule an activity or accept an invite in your Outlook calendar. You will need to determine which activity type you would like to use for these entries. If you use calendar syncing, this is not required because calendar syncing will take care of adding data to Act!
Please note that whenever you change the settings, you need to close and restart Outlook for the settings to take effect.
History Settings
You can select the History type for incoming messages, if you have configured Act4Outlook to record incoming messages.
Opportunity Settings
Here is where you decide the defaults of processes and products for recording individual emails into Act! by right-clicking the email.
Contact Exclusion Settings
Contact Exclusion Settings allows you to exclude contacts from automatic recording based on a value in your chosen field. This is convenient if you want to exclude emails to/from employees, or from a particular type of contact to be written to Act!
Sync Settings
Act4mail offers Contacts and Activity syncing. It also allows you to clear Outlook contacts and/or Calendar, if you would like to replace this data with data from Act! You will need to decide the range of records that should be synced as well as the direction of the sync. Two-way sync between Act! and Outlook is available as well. You can also set your Act4Outlook to sync automatically. If you are not making changes frequently, you can simply use Sync Now button to run a sync when you know it is needed. Recurring activities are not synced.
User-initiated syncs
If you have not selected automatic syncing, you have two main options. You can click Sync Now and then select between Contacts sync and Activities Sync when it is convenient for you to run a sync. You can also send records to Act! selectively as described below.
Sending Individual Records to Act!
With Act4Mail installed, you can decide not to record contacts and activities in Act! automatically, but send them to Act! on case by case basis, simply by right-clicking and then selecting one of the top five options.
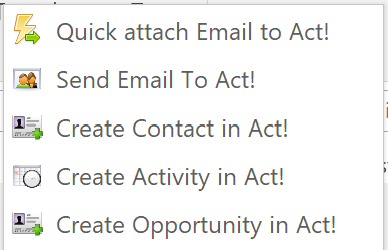
- Quick attach email to Act! lets you send the email to the contact's history in Act! How much of the email is recorded will depend on Act4Mail Settings > History Recording
- Send email to Act! lets you link the email to different entities: Company, Groups, Opportunities, Contacts. It is useful if you know of another contact or a company who should have the email within the history.
- Create Contact in Act! allows you to add the contact to Act! While the name and email address are transferred directly from Outlook, you will be offered a dialogue box in which you can enter values directed towards other Contact fields in your Act! database.
- Create Activity in Act lets you convert the email into an Act! activity. You will be able to adjust the values in the Activity fields before submitting.
- Similarly, Create an Opportunity in Act! lets you create an Opportunity in Act! using the email and the default settings established in Act! Database Settings > Opportunity Settings.
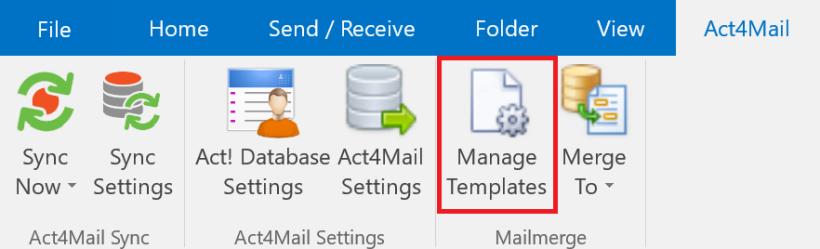
Templates and Mail Merging
Template editor can be accessed by going to Manage Templates. You can type into a blank template or open an existing template and edit it. You will be able to use Act! Contact Fields, Act! My Record Fields, and Opportunity Fields in your email or mail merge. Insert MailMerge dialogue is opened when you open template editor, if you need to re-open it, you can do so from a button on the top right.
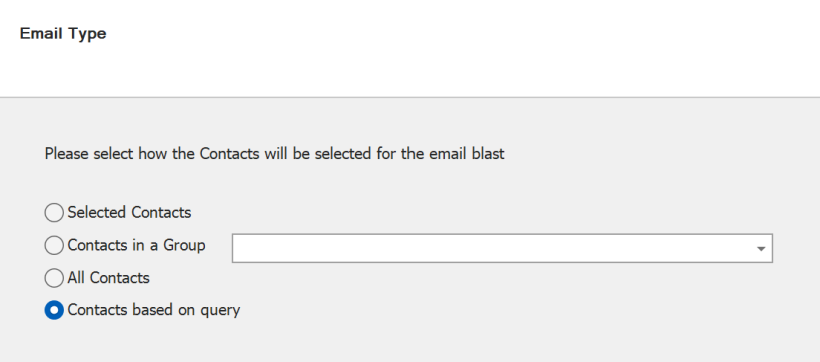
To merge into email or into Word documents, please click the MergeMail icon, select one of the two methods, and select the template you would like to be delivered. You will be given the option to deliver the message to:
- Selected contacts
- Contacts in a selected group
- All contacts
- Contacts based on a query - clicking Next button in this case will lead you to Advanced Query box, where you can Add parameters by clicking Add Button and then specifying the combination of fields, operators, and values which describes the contacts you wish to reach.
Clicking next will provide you with further sending options, such as From Email Address if you have multiple email addresses. If your set of contacts is large, you will want to split the sending into batches. Clicking Next again will let you add attachments.